Workspaces
Group experiences in workspaces, decide who can open them, add people and groups, give a workspace its own accent colour and logo, and archive it.
A workspace is a home for a group of experiences: the dashboards, apps and workflows of one team or one part of the business. It decides who can open those experiences, who may create new ones there, and it can carry its own accent colour and logo. People pick the workspace they are in from the switcher in the sidebar, and Ask and the lists then look in that workspace. See Workspaces for the idea, and Search and workspaces for how people use the switcher.
This page is the administrator's view: the list of workspaces, creating one, the members, the look and the life cycle (default, archive, restore).
Who can do this
Admins of Cortex Control do everything on this page. The owner of a workspace manages that workspace's name, description, members, accent colour and logo, and sees their workspaces under Your workspaces. Creating and archiving workspaces, the access rules and the default stay with an admin. Open Settings, then Workspaces (in the group People & access). The card only appears on installs that have workspaces.
The list of workspaces
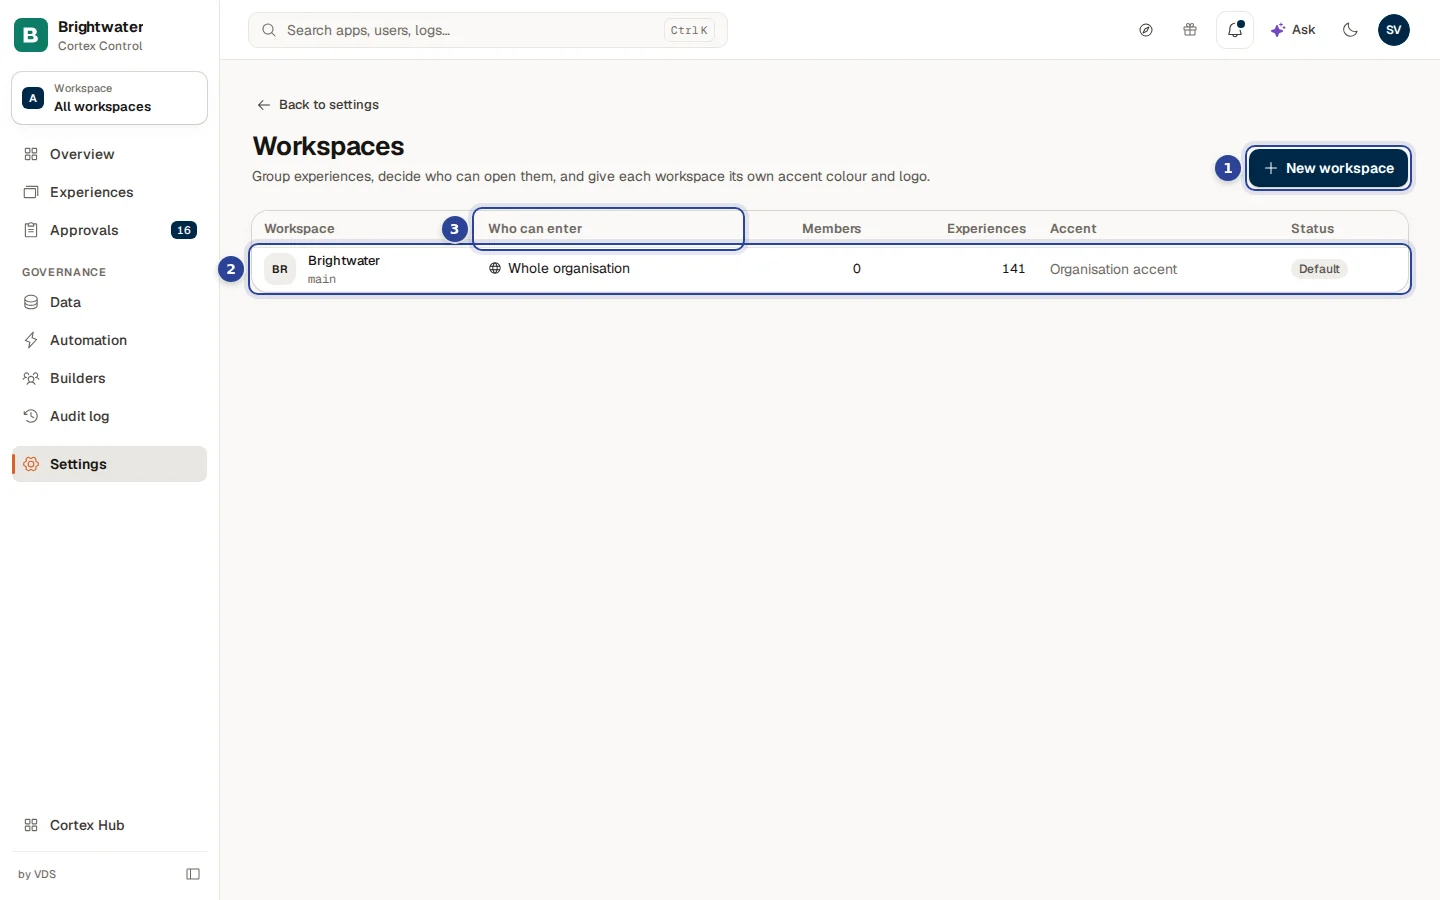
- New workspace. Opens the dialog to create one.
- A workspace row. The name with its tile and its address, and the columns that follow. Choose the row to open the workspace.
- Who can enter. The access rule: Whole organisation or Members only.
| Column | What it shows |
|---|---|
| Workspace | The tile (the accent colour or the logo), the name and the address used in links. |
| Who can enter | Whole organisation (everyone who has access to an experience can open it) or Members only (you must be a member). |
| Members | How many people and groups are a member. |
| Experiences | How many experiences the workspace holds. |
| Accent | The workspace's own accent colour as a swatch and a hex value, or Organisation accent when it follows Branding. |
| Status | Default for the default workspace, Archived for an archived one, otherwise Active. |
When some workspaces are archived, a box Show archived (n) appears above the list. They are hidden until you tick it. Manage workspaces in the workspace switcher opens this list too.
A fresh install shows "No workspaces yet" with a button to create the first one: "Every experience lives in a workspace. Create the first one and choose who owns it."
Create a workspace
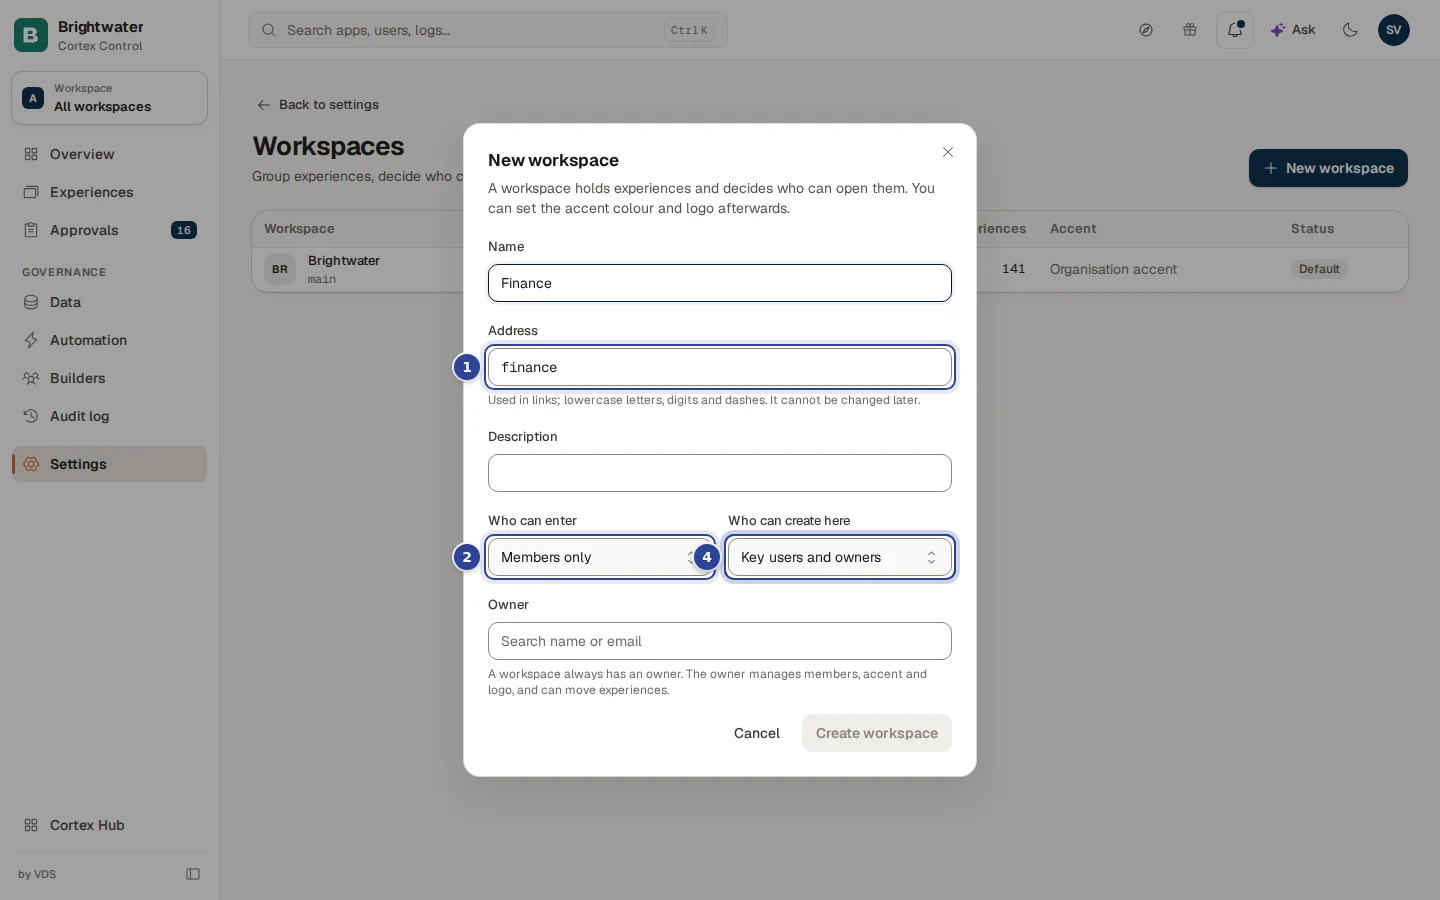
- Address. Used in links. It is made from the name as you type, but you can change it: 2 to 63 lowercase letters, digits and dashes. It cannot be changed later.
- Who can enter. Members only or Whole organisation.
- Who can create here. Key users and owners or Any builder.
- Owner. Search a person by name or e-mail and pick them. A workspace is never without an owner.
Choose New workspace
Choose New workspace at the top right of the list.
Name it
Enter a Name (1 to 128 characters). It is shown in the switcher and on every list. Add a Description if you like: one line that tells people what the workspace is for (up to 512 characters).
Set the rules
Choose Who can enter and Who can create here. The defaults are the safest: Members only and Key users and owners.
Pick the owner and create
Pick the Owner and choose Create workspace. The button is disabled until the name, a valid address and an owner are filled in. A message confirms it ("Workspace … created.") and the new workspace opens. You set the accent colour and the logo afterwards.
Manage one workspace
Choose a row to open a workspace. The top shows its tile, name, address and a badge when it is the default or archived. Under it come four sections, one below the other: General, Members, Accent and logo and Default and archive. All workspaces goes back to the list. An archived workspace shows a notice and is read-only until you restore it.
General
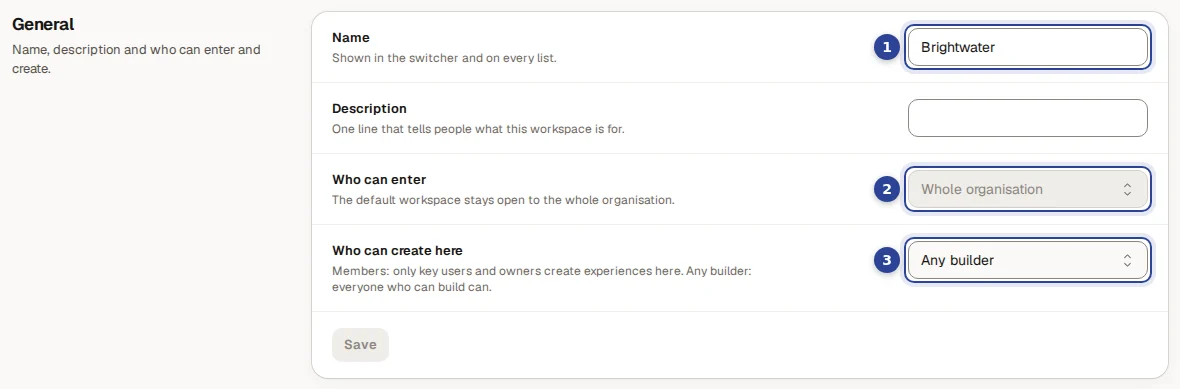
- Name. Up to 128 characters. An owner can change it.
- Who can enter. Members only: people need to be a member to open its experiences. Whole organisation: everyone who has access to an experience can open it. Only an admin can change this, and the default workspace always stays open to the whole organisation.
- Who can create here. Key users and owners (only key users and owners create experiences here) or Any builder (everyone who can build). Only an admin can change this.
The Description sits between the name and the rules. Choose Save; a message confirms it ("Workspace saved."). A field you may not change is greyed out.
Members
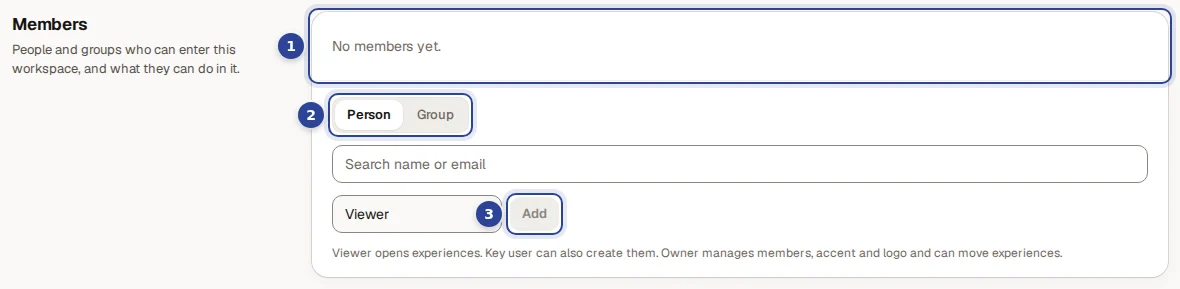
- The member list. The default workspace in the picture has none yet ("No members yet."). Each member is a person or a group, with a role list and a remove button. The role list changes the role at once ("Role changed.").
- Add a person or a group. Choose Person or Group.
- Add. Adds the member with the role chosen next to it ("Member added.").
| Role | What the member can do |
|---|---|
| Viewer | Opens the experiences of the workspace. |
| Key user | Opens them and can also create experiences there. |
| Owner | Manages members, accent colour and logo, and can move experiences. |
A workspace needs at least one owner: the last owner cannot be demoted or removed ("A workspace needs at least one owner. Make someone else an owner first."). Someone who is already a member is changed, not added again. Removing a member ("Remove … from this workspace?") takes away their access to the workspace; access they were given to single experiences stays as it is.
Add a group
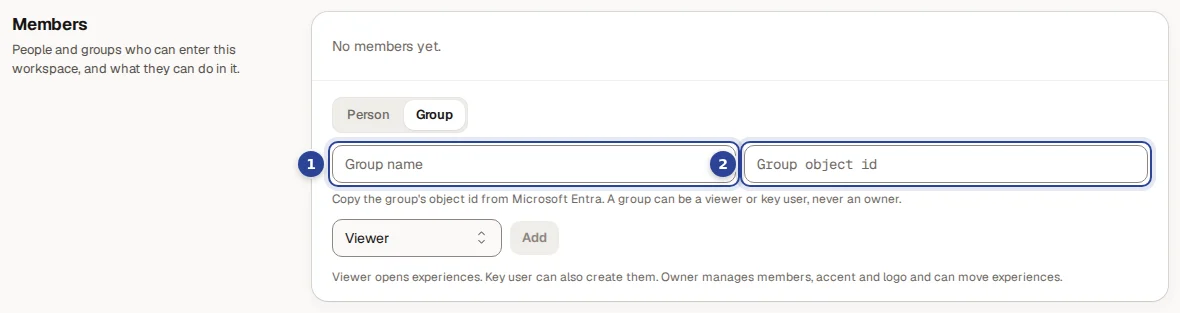
- Group name. The name you want to see in the list.
- Group object id. Copy the object id of the group from Microsoft Entra. It has to be an id in the usual format; the field turns red when it is not.
A group can be a viewer or a key user, never an owner. People get access through a group only when Cortex Control can read the group's members from Microsoft Entra. When it cannot yet, the group is saved but gives nobody access, and the page says so; ask your Entra administrator to grant Cortex Control the permission the message names.
Accent and logo
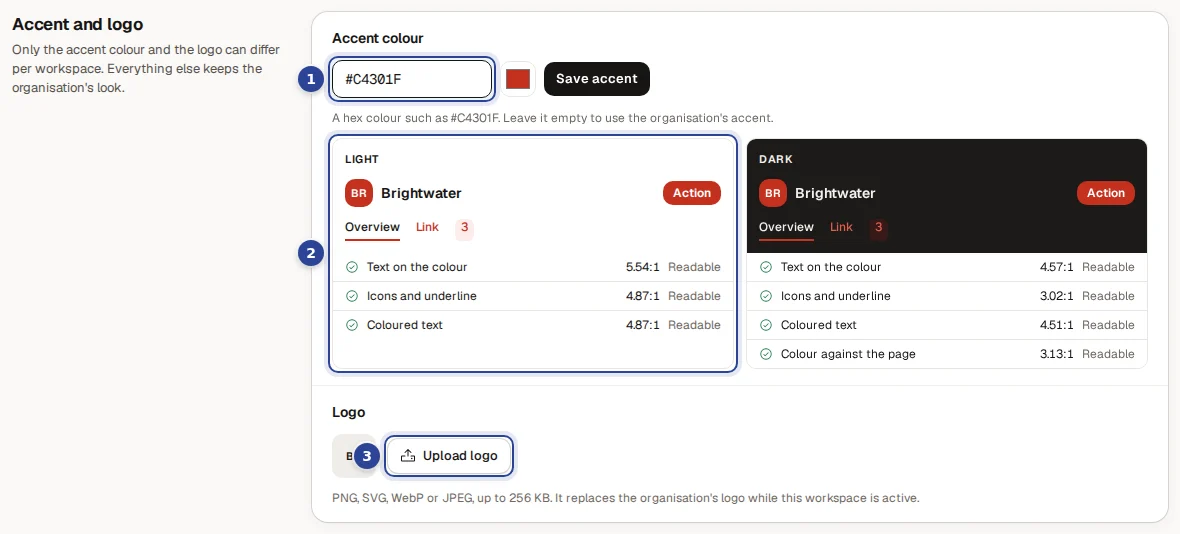
- Accent colour. A hex colour such as a red
#C4301F, typed or picked with the swatch. Leave it empty to use the organisation's accent. Save accent stores it; with an empty field the button reads Use organisation accent. - Readability in light and dark. Two small panels (Light and Dark) show how the accent lands on a tile, the action button, a tab and a link, with the contrast of each pair and whether it is Readable.
- Upload logo (Replace logo when there is one). A PNG, SVG, WebP or JPEG of at most 256 KB. It replaces the organisation's logo while this workspace is active. Remove deletes it.
Only the accent colour and the logo can differ per workspace; everything else keeps the organisation's look. A pale colour is not refused: it is made readable, and the page tells you ("Adjusted for readability: buttons and tiles keep your colour, but text and icons use … in light mode and … in dark mode"). Only a colour that cannot be made readable in both light and dark is refused, with the failing pairs listed. A logo with scripts in it (an SVG with embedded content) is refused: export a plain SVG or use a PNG.
Default and archive

- Make default. New experiences land here when no workspace is chosen. The default is always open to the whole organisation, and the former default keeps its experiences. You confirm first ("Make … the default workspace?").
- Archive. Hides all the workspace's experiences from everyone, owners included. Nothing is deleted.
Choose Archive
Choose Archive on the workspace. The default workspace cannot be archived ("Make another workspace the default first.").
The dialog says that the experiences disappear from the Hub for everyone and that you can restore the workspace at any time.
Move what is still in it
When the workspace still holds experiences, the dialog says how many and asks Move experiences to a workspace you choose. They are all moved in one go and each move is recorded in the audit log.
Confirm or restore later
Choose Archive. A message confirms it. An archived workspace shows Restore instead: it makes the experiences visible again to the people who could open them before.
To move one experience to another workspace, see Apps and experiences.
Owners who are not admins
A workspace owner who is not an admin sees Your workspaces: the workspaces they own, each with its number of members. They choose one to manage its name, description, members, accent colour and logo. The page says: "Creating or archiving workspaces and the access rules stay with an Admin." Someone who opens a workspace they do not manage sees "You do not manage this workspace".
Example: a Finance workspace for Brightwater Foods
The finance team at Brightwater Foods wants its own dashboards, visible only to finance.
- Sam de Vries opens Settings, Workspaces and chooses New workspace. Sam names it "Finance", leaves Who can enter on Members only and picks Anna from finance as Owner.
- Anna opens the workspace and adds the finance group from Microsoft Entra as Viewer and two colleagues as Key user.
- Anna sets a dark blue as accent colour and checks the Light and Dark panels: both are readable.
- Sam moves the three finance dashboards to the new workspace from Apps and experiences. People who are not members no longer see them.