Apps
Create an app, follow its provisioning, manage it tab by tab, and know the difference between archive, delete and destroy.
An app is a generated application that a builder made in Studio and that people open in Cortex Hub. In Cortex Control you are the one who sets it up and keeps it healthy: you create the app, watch it being provisioned, decide who may open it, whether it may use AI or reach the internet, and what happens when it is retired.
The catalogue that lists apps together with dashboards and workflows is the page Experiences. This page is about the apps themselves.
Who can do this
Admins of Cortex Control. Builders can only create an app themselves when Builder permissions allow it, or after you approve their request in Approvals.
Find your apps
Open Experiences and choose Apps in the kind filter. Each row shows the app with its owner, its status and who can open it. Choose a row to open the app's page. (The old page "Apps" no longer exists: its address leads to this filter.)
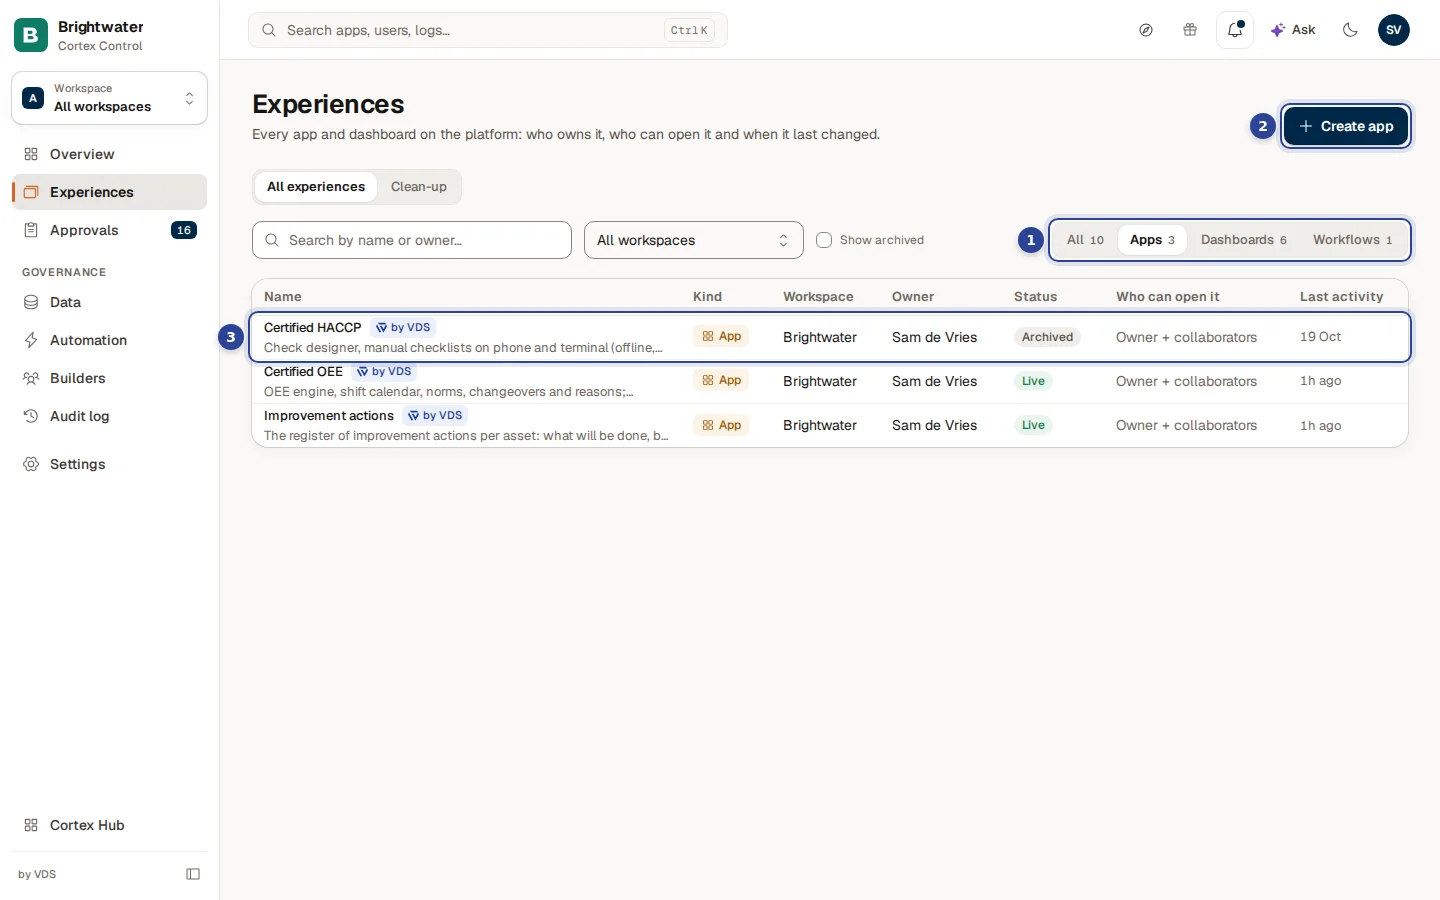
- The kind filter with Apps chosen. The number next to it is how many apps there are.
- Create app. Starts the form for a new app (see below).
- An app row. Choose it to open the app. A status such as provisioning or failed shows while the app is being set up.
Create an app
Choose Create app on Experiences or on Overview. The page says "Provision a new app end-to-end: database schemas, Entra app, cluster runtime and source repository."
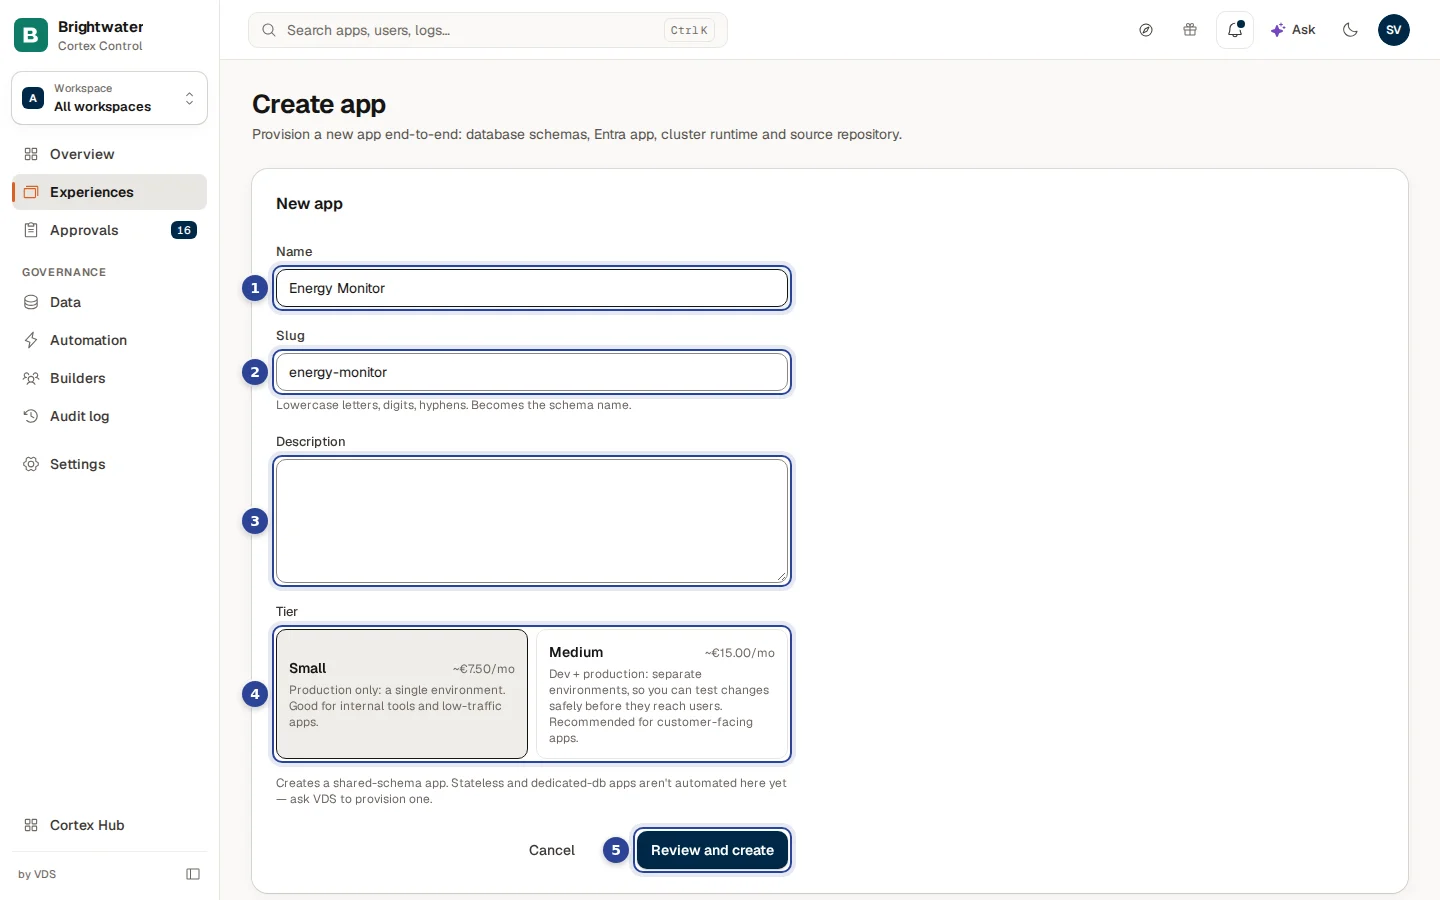
- Name. Required, for example "Energy Monitor".
- Slug. Follows the name. It allows lowercase letters, digits and hyphens only, at most 64 characters, and it becomes the database schema name (hyphens become underscores). A line under it shows the Schema.
- Description. Optional.
- Tier. Small is a single production environment ("Good for internal tools and low-traffic apps."). Medium has separate dev and production environments, so changes can be tested before users see them ("Recommended for customer-facing apps."). Each tier shows an estimated monthly amount.
- Review and create. Opens a summary.
Fill in the form
Enter a Name. Check the Slug, add a Description and pick the Tier.
Review
Choose Review and create. The dialog "Create '…'?" lists the resources that will be created: the database schemas for production and for preview, the app runtime on the cluster, the Entra app registration with its roles, the database credentials as a cluster secret, and the source repository made from the app template. It says this takes about two to three minutes.
Create and watch
Choose Create and provision. A message says "Provisioning started" and you land on the Provisioning page.
This form makes an app with a shared schema. For other kinds of apps, ask VDS.
Follow the provisioning
The Provisioning page shows eight steps with live progress ("3 of 8 steps complete", "running: …"):
| Step | What happens |
|---|---|
| 1 | Database schemas and roles |
| 2 | The app runtime is created (Deployment, Service, Ingress) |
| 3 | The Entra app is registered |
| 4 | The runtime is configured (sign-in, API token, data key) |
| 5 | The source repository is created |
| 6 | Migrations are applied to the dev schema |
| 7 | The setup kit is generated |
| 8 | The app is marked ready |
If a step fails, choose Retry from last failed step. To stop, choose Cancel + clean up: it deletes the app's cluster objects, drops both database schemas and their roles, and marks the app inactive. Cleanup is best-effort: the source repository and the Entra app registration stay and may need to be removed by hand. Back to app returns to the app page.
Manage one app
Open the app from Experiences.
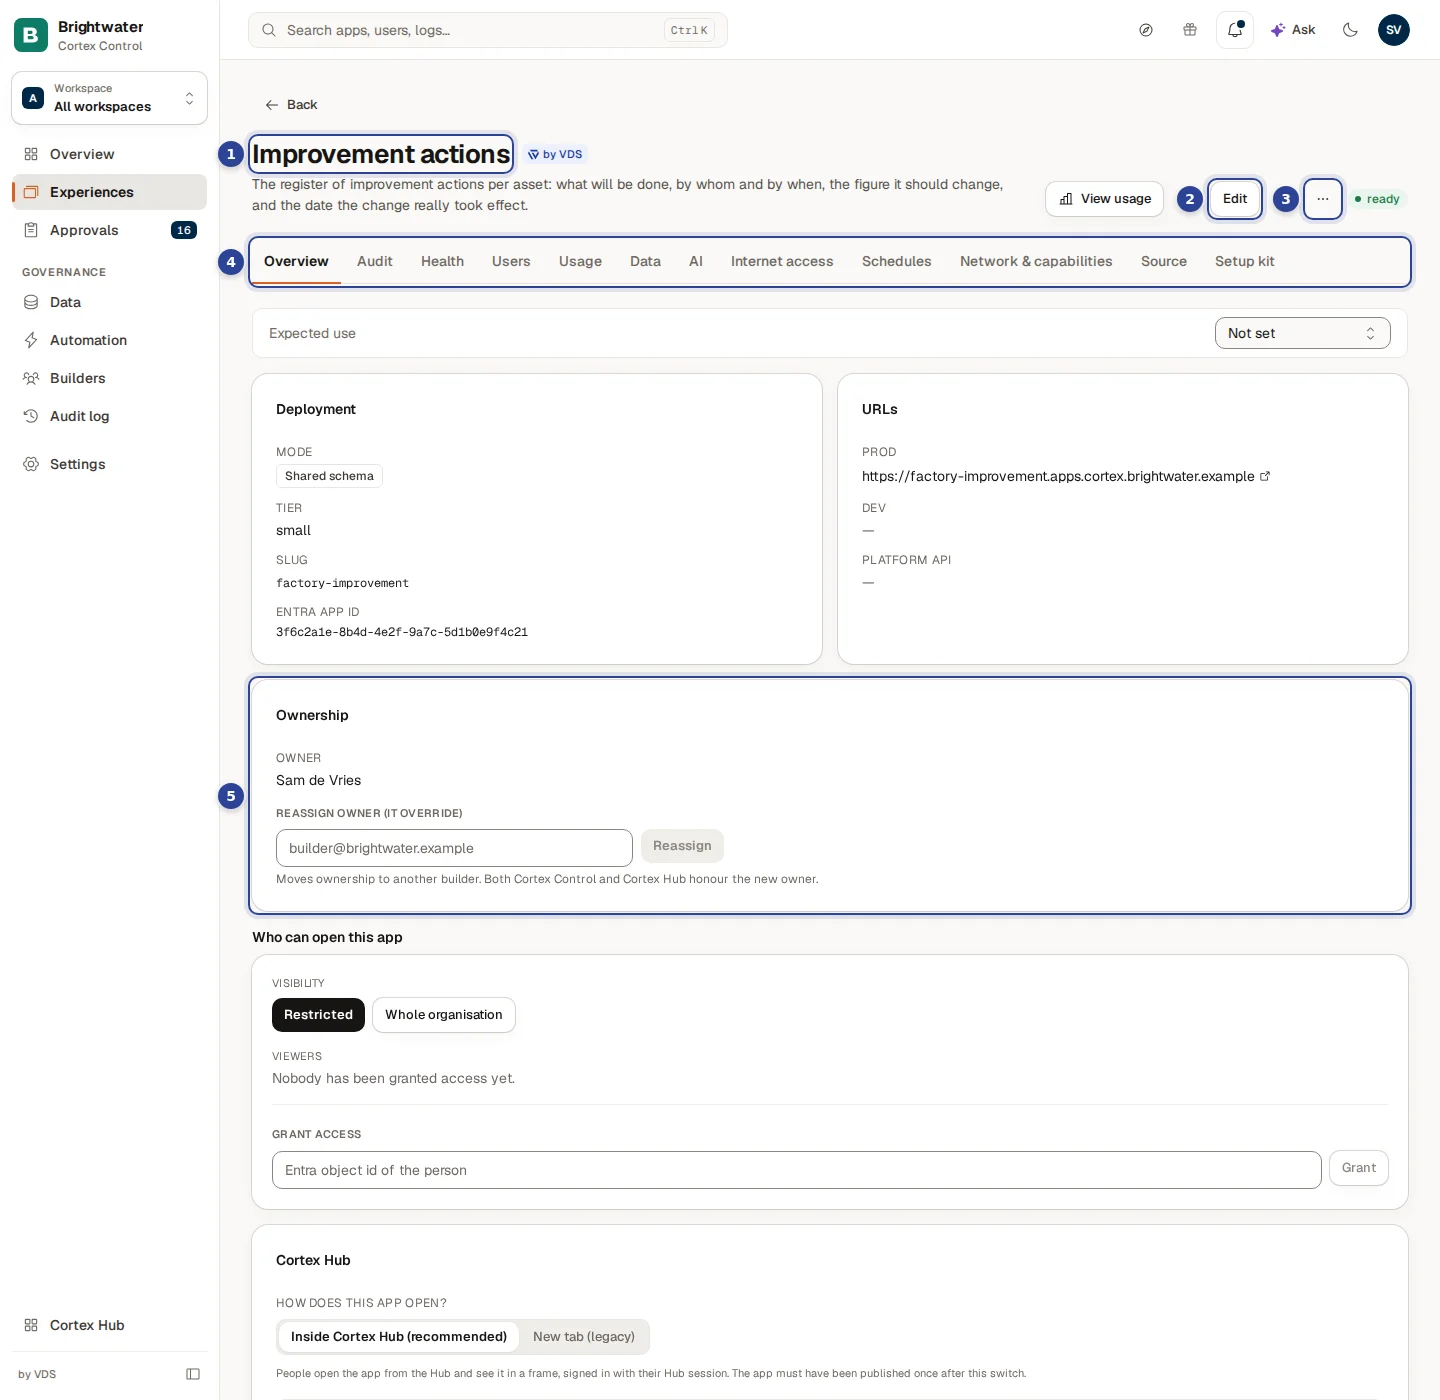
- The name and the status. The status badge shows the provisioning state. A published app that does not run says so next to it.
- Edit. Changes the app's name, description and its development and production addresses.
- More actions. The menu with Archive, Move to workspace, Delete and Destroy (see below).
- The tabs. One per area, described next.
- Ownership. The owner, with Reassign owner (IT override).
| Tab | What you do there |
|---|---|
| Overview | The data and infrastructure details, a card URLs with the production, development and platform API addresses, and the Ownership card: Reassign owner (IT override) moves ownership to another builder, and Cortex Control and Cortex Hub both follow the new owner. The card Who can open this app sets the visibility and the viewers (see Experiences). Admins also find the Hub settings and Add to Teams for this one app here. The Hub settings card has a switch Offline use (off by default, Admins only, recorded in the audit log): it lets people open the app and keep working without a connection, and it can only be on while the app can also be opened outside the Hub (a new tab, or the direct link allowed); until then the switch says "Allow opening outside the Hub first.", and the direct link cannot be turned off while it is on. Use it only on company devices with disk encryption and a screen lock: the app does not encrypt anything on the device. Turning it off makes devices delete the offline copy the next time they are online; work that has not been sent yet is kept and still sends. |
| Audit | An advisory code scan: Run quick scan. It never blocks a deploy, and it may not be in your plan ("Code audit isn't included in this tenant's plan."). |
| Health | Live status with uptime over the last 24 hours and 7 days. The probe runs every minute. |
| Users | Add user: pick a role and a person. Switch a person between Active and Inactive (an inactive person sees "access switched off"), or remove them. Removing revokes their role in Entra; a sign-in that already exists can last up to about an hour. |
| Usage | Monthly active users and sign-in activity. |
| Data | The cards Active data keys, Approved access ("of n requested"), Syncs and Prod readiness. A data key is never shown, only its prefix and use. Rotate issues a new one; Revoke stops the app's next data call. |
| AI | An app only gets AI when you approve it here: choose Approve with the Largest model allowed, a cap per person per day and a cap per month for the whole app, and tick what the app may send: text answers and structured (JSON) answers are on by default, Documents (PDF, Word and text files, read as text) and Images (PNG, JPEG, WebP, GIF, HEIC and HEIF, up to 4 per request, 10 MiB each, 15 MiB together with the documents) are off unless the request asked for them; tick or untick them before you approve. A request with pictures needs a model for the app's tier that can read images; if there is none, the app gets an error (422) saying the model for that tier cannot read images, and nothing is sent or charged (pick one in Settings > AI engine). There is no unlimited. Reject declines, and Revoke stops the AI at once. When Allow AI in apps is off in Policy, the tab says no app can use AI. |
| Internet access | Which outside sites the app's server code may reach. Off changes nothing. Log only records what the app calls and blocks nothing: use it first. Enforce allows only the Approved hosts, one per line (a host name or a whole domain such as *.example.com, HTTPS only). Sign-in always works. Saving restarts the app. |
| Schedules | Timers the app asks for. A new or changed schedule waits here as Waiting for approval until an admin approves it; the route can still be run by hand meanwhile. |
| Network & capabilities | Admins only. Which outside web services the app's browser code may load, and two capabilities that stay off unless the app needs them. |
| Source | Where the source repository lives. |
| Setup kit | A short guide for working on the app on your own machine: the source repository, the public sign-in settings and the database settings. It holds no passwords and no deployment tokens. Apps are built and published from Studio. |
Archive, delete or destroy
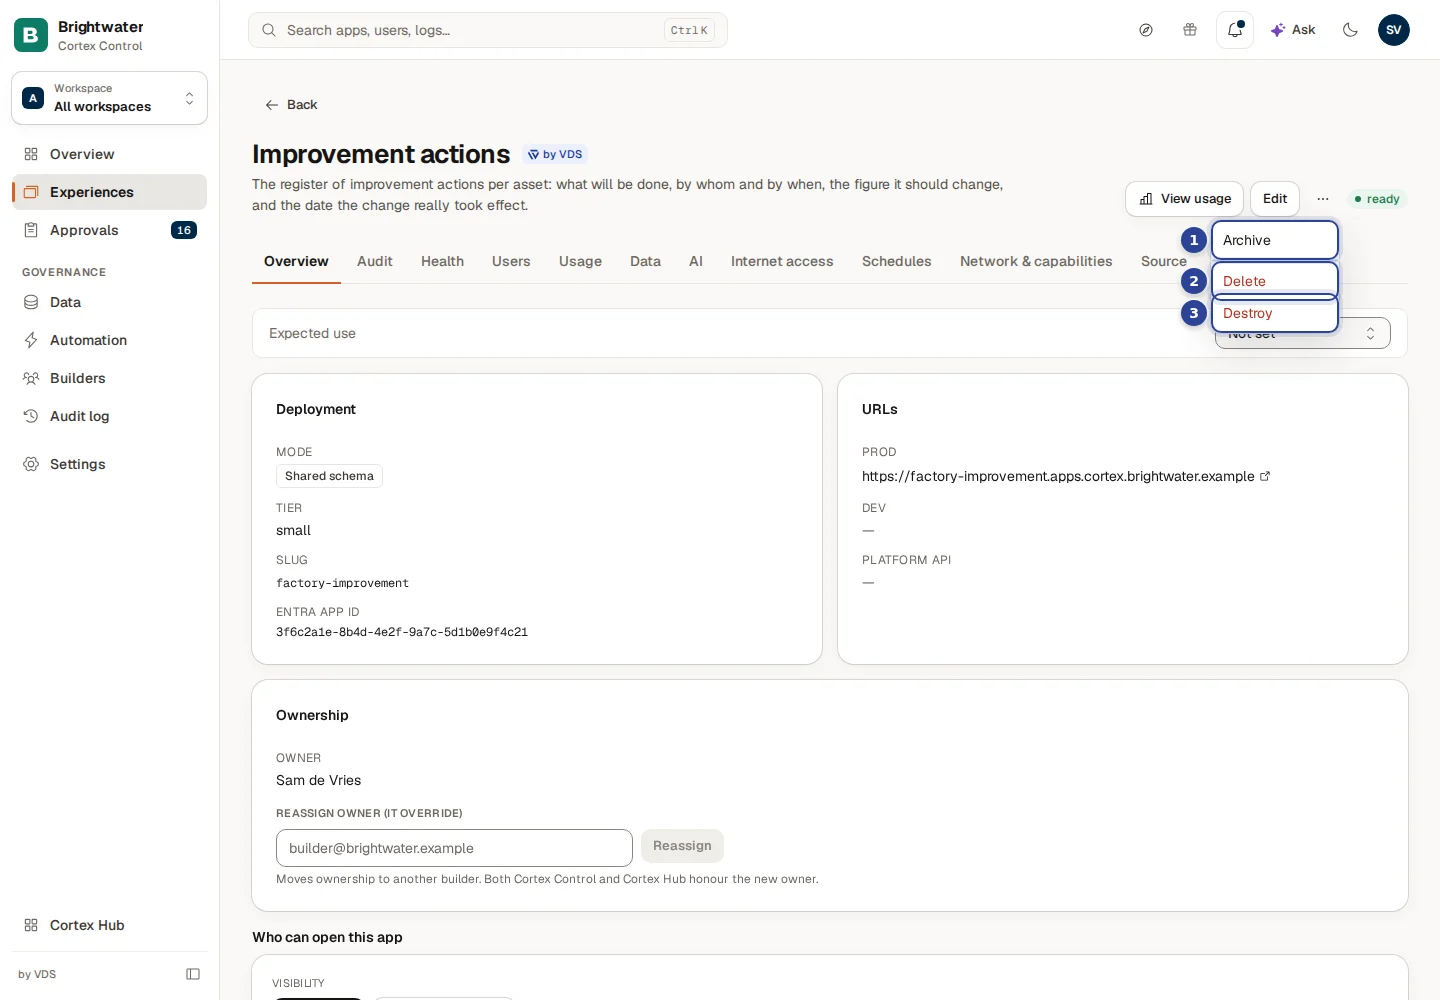
- Archive. Hides the app from the Hub, the catalogues and Studio's lists. Nothing is deleted or switched off, and Restore brings it back.
- Delete. Hides the app from the catalogue only. Its runtime, database schemas, source repository and Entra registration stay.
- Destroy. Removes every resource Cortex Control created for the app, including its data.
When your organisation uses workspaces, the menu also has Move to workspace, which moves the app to another workspace.
Destroy cannot be undone. You confirm Delete and Destroy by typing the app's slug; Destroy also asks you to tick that you understand the action is permanent. When it finishes it says "Destroyed '…'. All resources cleaned." or lists the cleanup errors.
To hide an app without removing anything, use Archive.
Example: a new app at Brightwater Foods
The planning team asks for an app that shows the packing schedule.
- A builder requests it; the request lands in Approvals. Sam de Vries approves it and provisioning starts. (With Allowed in builder permissions, there would be no request.)
- Sam follows the eight steps on Provisioning. Step 3 fails once; Sam chooses Retry from last failed step and it finishes.
- On the AI tab the builder's request waits. Sam approves it with the smallest model and a low cap per person per day.
- On Internet access Sam sets Log only for a week, reads which hosts the app calls, then switches to Enforce with exactly those hosts.
Frequently asked questions
Approvals
Decide the requests that wait for a person: new apps, data access, integrations, action runs, publishing, workflow tasks and dashboard reviews.
Experiences
See every app, dashboard and workflow in one catalogue, decide who can open each one, clean up what nobody uses, and archive, restore or move items.