Workflows: build the steps
Create a workflow from a sentence or a starter, add steps, set up approvals and decisions, choose what starts it and give it the data it needs.
A workflow is a process with steps: an approval, an intake, an escalation, or something that watches your data and acts. Instead of someone remembering to chase a manager, the workflow waits, asks, writes the result to the right system and leaves a trace of what happened.
You build it by chatting with the assistant, by editing the canvas, or both. Running it, testing it and publishing it are covered in Test, run and publish a workflow. This page is about building: creating, the canvas, every kind of step, what starts a workflow, access, sample data and the test dock.
Who can do this
Builders (people with a Studio seat) and admins. If your organisation's builder policy sends new workflows to IT, choosing Request workflow asks IT to approve first. Once the workflow is live, people who must approve a step find it in their Inbox, see Inbox.
The example in this page
Brightwater Foods wants every large sales order to be checked before it reaches the ERP. Sam de Vries builds this workflow: a sales order waits for the manager, then is written to the ERP.
A sales order arrives, or someone starts the workflow.
The manager gets a task in the Inbox.
After approval, the order is written to the ERP.
The run is finished and kept in the run history.
Create a workflow
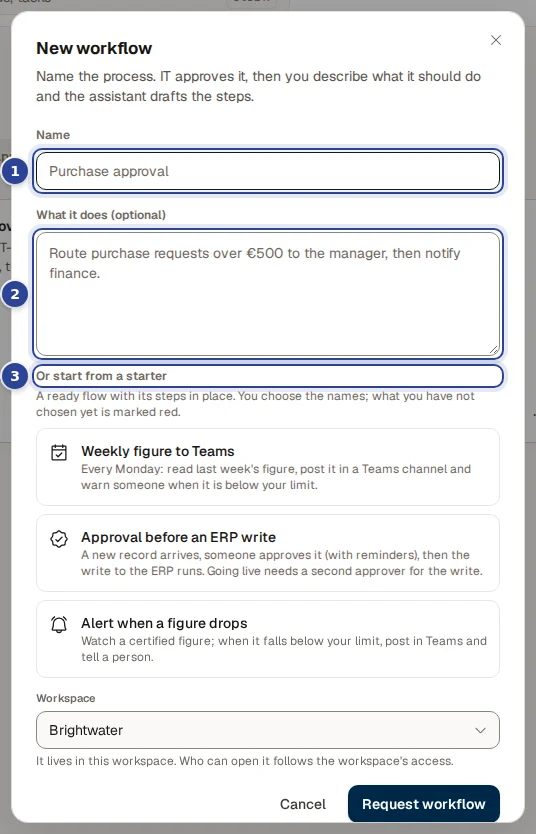
- Name. What people will see in Experiences and in the Inbox, for example "Order approval".
- What it does (optional). One or two sentences about the process. The assistant reads this when it drafts the steps.
- Or start from a starter. Ready flows with their steps in place: a weekly figure posted to Teams, an approval before an ERP write, and an alert when a figure drops. Below them you choose the Workspace the workflow lives in; who can open it follows that workspace's access.
Open the New window
Open Experiences, choose New and pick Workflow under "Start from scratch".
Name it
Give it a Name. Under "What it does (optional)" write a sentence about the process. If you use several workspaces, choose the Workspace too.
Send it
Choose Request workflow. If your builder policy lets you build workflows yourself, the workflow is created and opens in the editor at once; otherwise IT reviews it first. Then describe the process in the chat and the assistant drafts the steps.
If you use Start something with AI and describe the workflow in a sentence, the same window opens with your sentence filled in and the button reads Create and draft. Cortex then creates the workflow and drafts its steps from your sentence (one AI turn). You review them before anything runs. A step that could not be drafted because the data or action is not available is marked red.
If you would rather begin from a ready flow, choose a starter under "Or start from a starter". Choose Create from starter, or tick Fill it in for me to let Cortex fill in names from your catalogue (the button then reads Create and fill in). What you have not chosen yet is marked red.
The editor at a glance
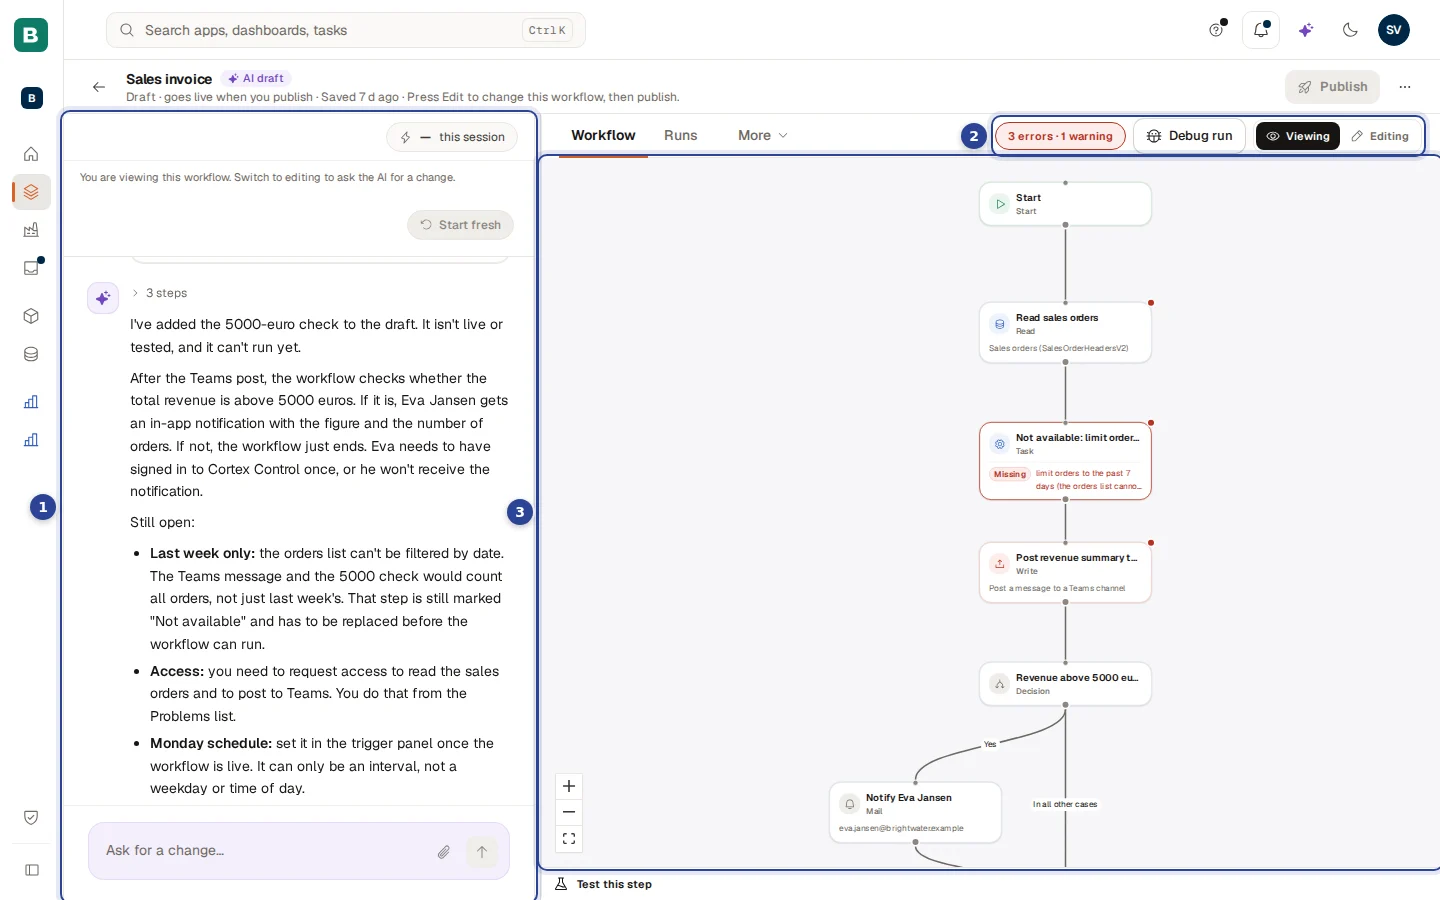
- The chat. Ask for a change in your own words; the assistant proposes it and tells you what it did. A draft the assistant wrote carries an AI draft mark next to the name until a person edits it.
- The strip above the canvas. Next to the tabs Workflow, Runs and More you see the problem count (here "3 errors · 1 warning"; "No problems" when the flow is clean), Debug run, and the switch between Viewing and Editing.
- The canvas. The steps from top to bottom, with a line for every connection. A step the draft could not fill in is outlined in red and marked Missing. Use the buttons at the bottom left to zoom and to fit the flow in the window.
The bar at the very top has the name, a state line ("Draft · goes live when you publish", or "Live v1 ..." with how many changes are not published yet), Publish and the ... menu (see the section The ... menu below).
What the tabs hold
| Tab | What it shows |
|---|---|
| Workflow | The canvas, with the step settings opening beside it. |
| Runs | The runs of this workflow. See Test, run and publish a workflow. |
| More | Access, Schedule, Sample data, Changes (a live workflow with changes that are not published yet) and Versions. |
Change a workflow with the assistant
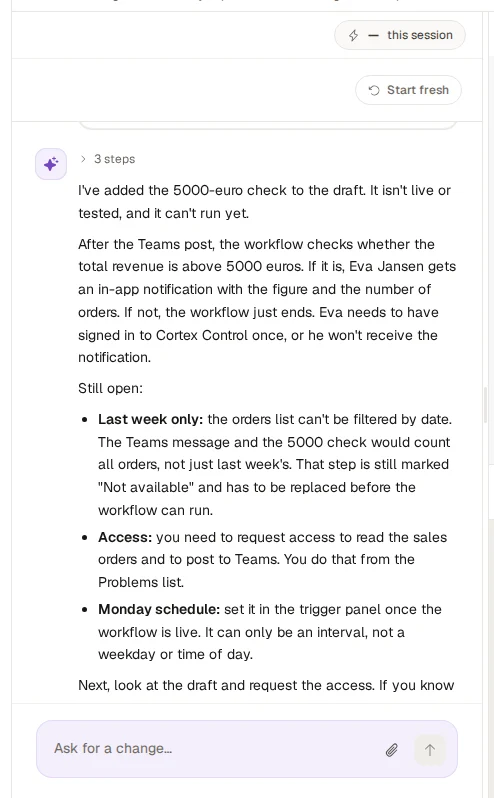
The chat is on the left of the editor. Ask for a change ("Ask for a change...") and the assistant edits the draft. It never publishes and never runs anything. An empty chat offers three ideas to start with: add a manager approval before the last step, explain what the workflow does step by step, and fix the problems the check found.
- Switch to Editing first: while the canvas shows Viewing the chat tells you to switch before it can change anything.
- A reply ends with what is still open: access to request, a step to replace, a schedule to set. Treat that list as your to-do.
- A line such as "AI changed the workflow" tells you what moved. On a live workflow, the Changes shown badge means the steps that differ from the live version are coloured New or Changed. Select it to hide the colours (it then reads Proposed changes).
- Start fresh (top of the chat) clears the conversation so the next question starts clean. The small "this session" chip shows what the session has used.
Work on the canvas
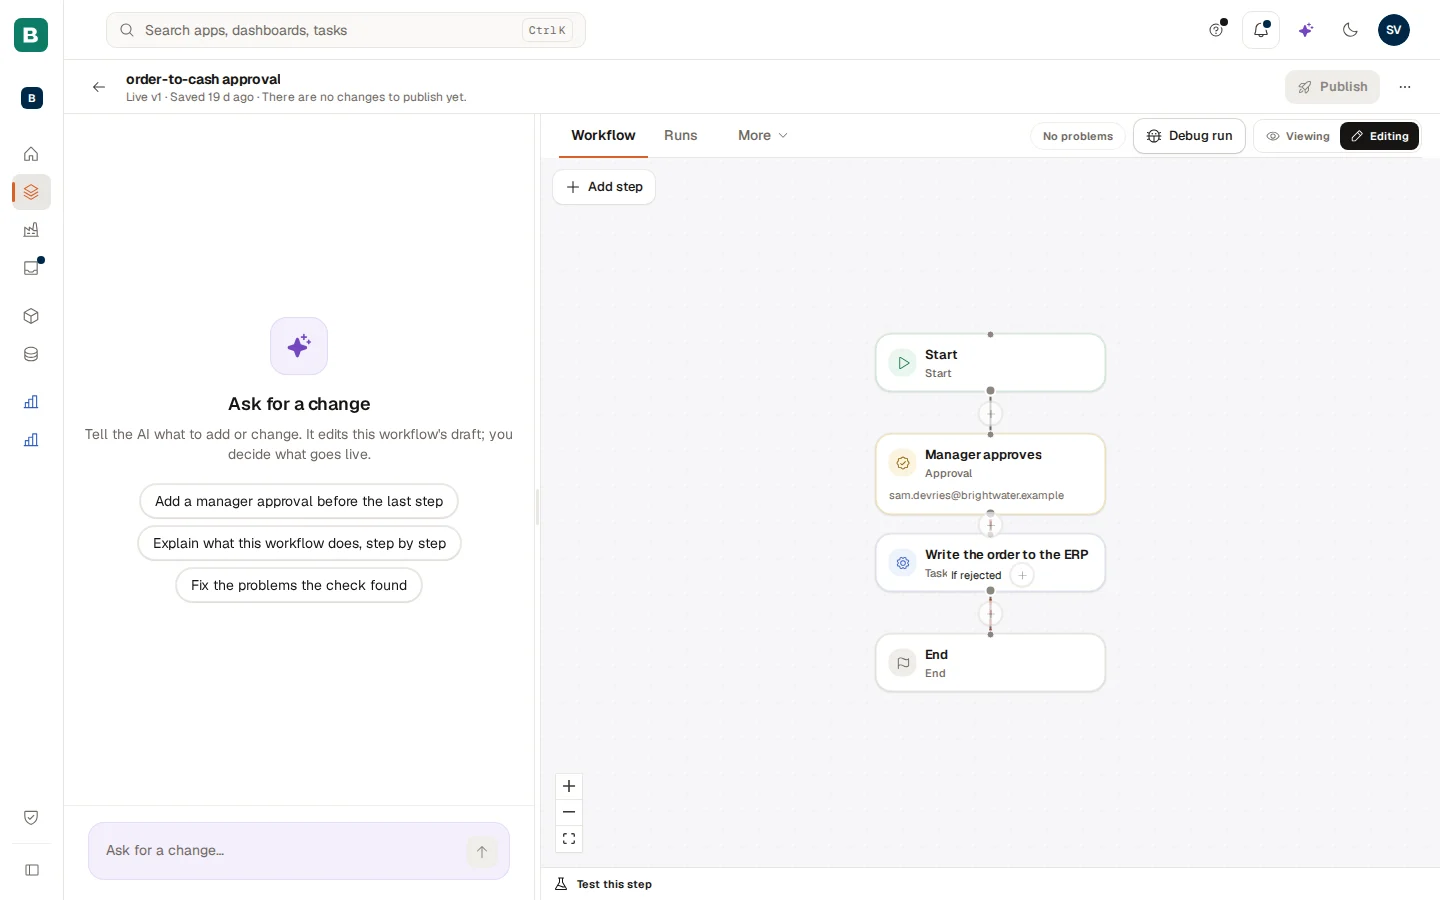
The workflow of the example, in editing mode. Editing shows the Add step button and a small plus on every line.
Switch on Editing
Choose Editing in the strip above the canvas. A live workflow stays safe: your changes are a draft until you publish.
Add a step
Select a step first and choose Add step to add one after it; without a selection the step goes at the bottom. The plus on a line inserts a step in between. Both open the step picker.
Edit the settings
Select a step. Its settings open beside the canvas. Change them and choose Save step. Delete removes the step and joins the steps before and after it.
Connect or disconnect
Drag from the bottom handle of a step to another step to connect them. Select a line to delete it. Flows only go forward: a connection that would make a loop is refused. Undo with Ctrl+Z.
The step picker
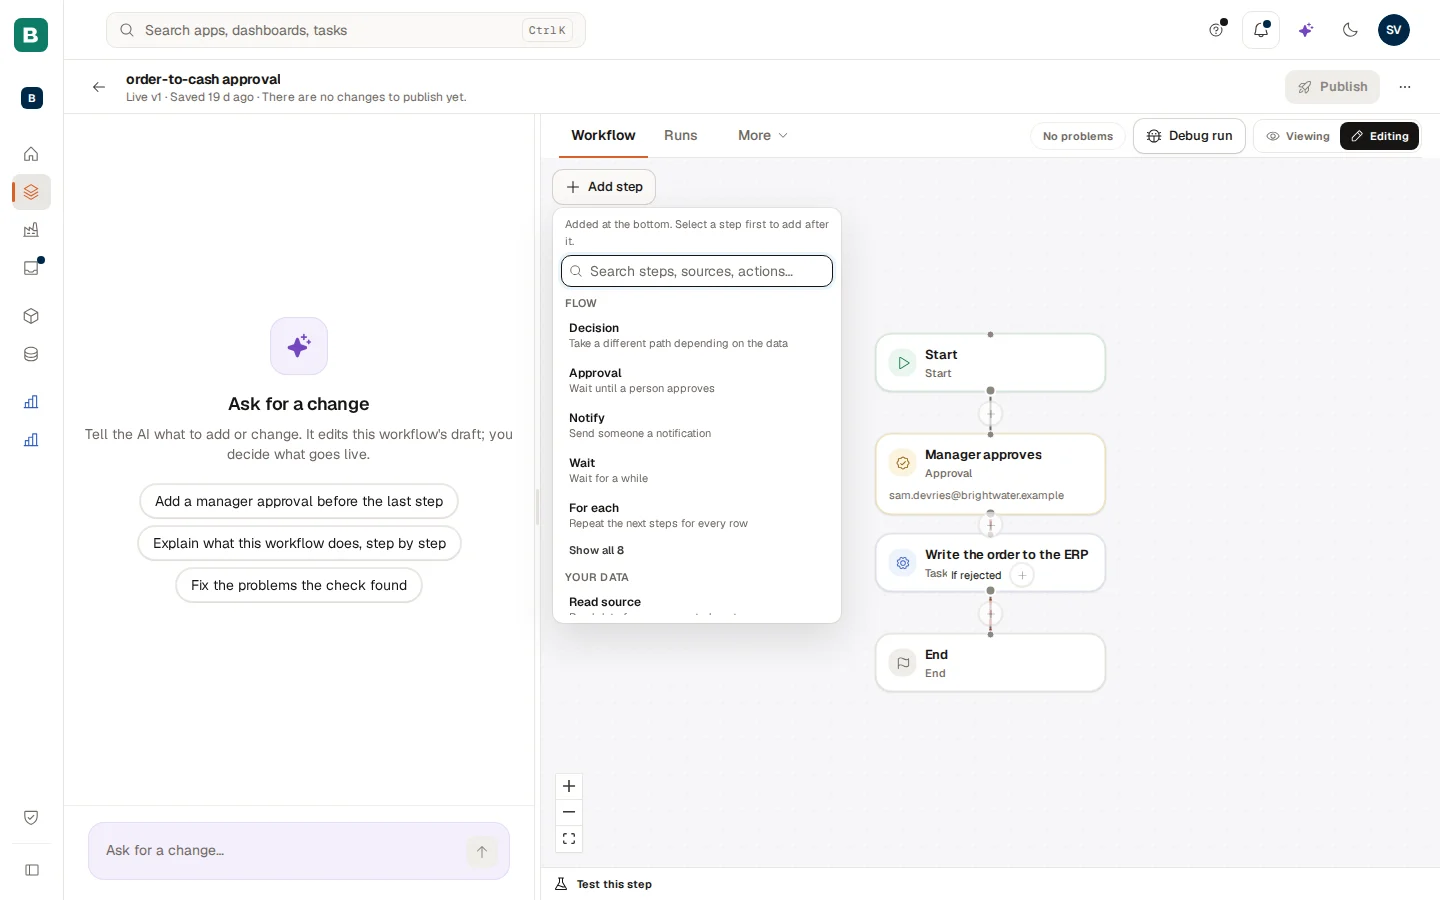
Type in the search box ("Search steps, sources, actions...") to find a step by name, a source or an action. Under Flow the picker shows the first five kinds and "Show all 8"; Your data follows below. A step whose capability is not switched on yet says so in the picker.
Every kind of step
The steps in the Flow group:
| Step | What it does | Good to know |
|---|---|---|
| Decision | Take a different path depending on the data. | Branches are checked top to bottom; Otherwise is taken when no other branch matches. Each branch has a Condition and an optional name shown on the line. |
| Approval | Wait until a person approves. | See Set up an approval. |
| Notify | Send someone a notification. | Fill in the Message; it defaults to the step's name. |
| Wait | Wait for a while. | A time such as 30m, 2h or 7d. |
| For each | Repeat the next steps for every row. | Up to a row limit (maximum 200). |
| Parallel | Run several branches at the same time. | Up to 5 branches. A branch cannot hold an approval, a timer, a loop or another parallel step. The Join step waits for all branches. |
| Step | A milestone with no effect. | Useful as a label on the canvas. |
| End | Finish this path. |
The steps in the Your data group:
| Step | What it does |
|---|---|
| Read source | Read data from a connected system. |
| Read records | Read records of a model's object type, such as the open deals closing this week. |
| Read a figure | A certified figure for a period, such as last week's revenue. See Figures and certification. |
| Run an action on a record | Run an action the model offers on one record, such as adding a note to a deal. |
| Write | Do something in a connected system (an action). |
| App call | Write rows into one of your apps' tables. |
| AI step | Classify, extract, summarise or decide with AI (read-only). IT must first switch AI steps on; until then the picker says so. |
| Run workflow | Run another live workflow as one step. The other workflow must allow it on its start step and cannot hold an approval or a timer. |
Step settings in practice
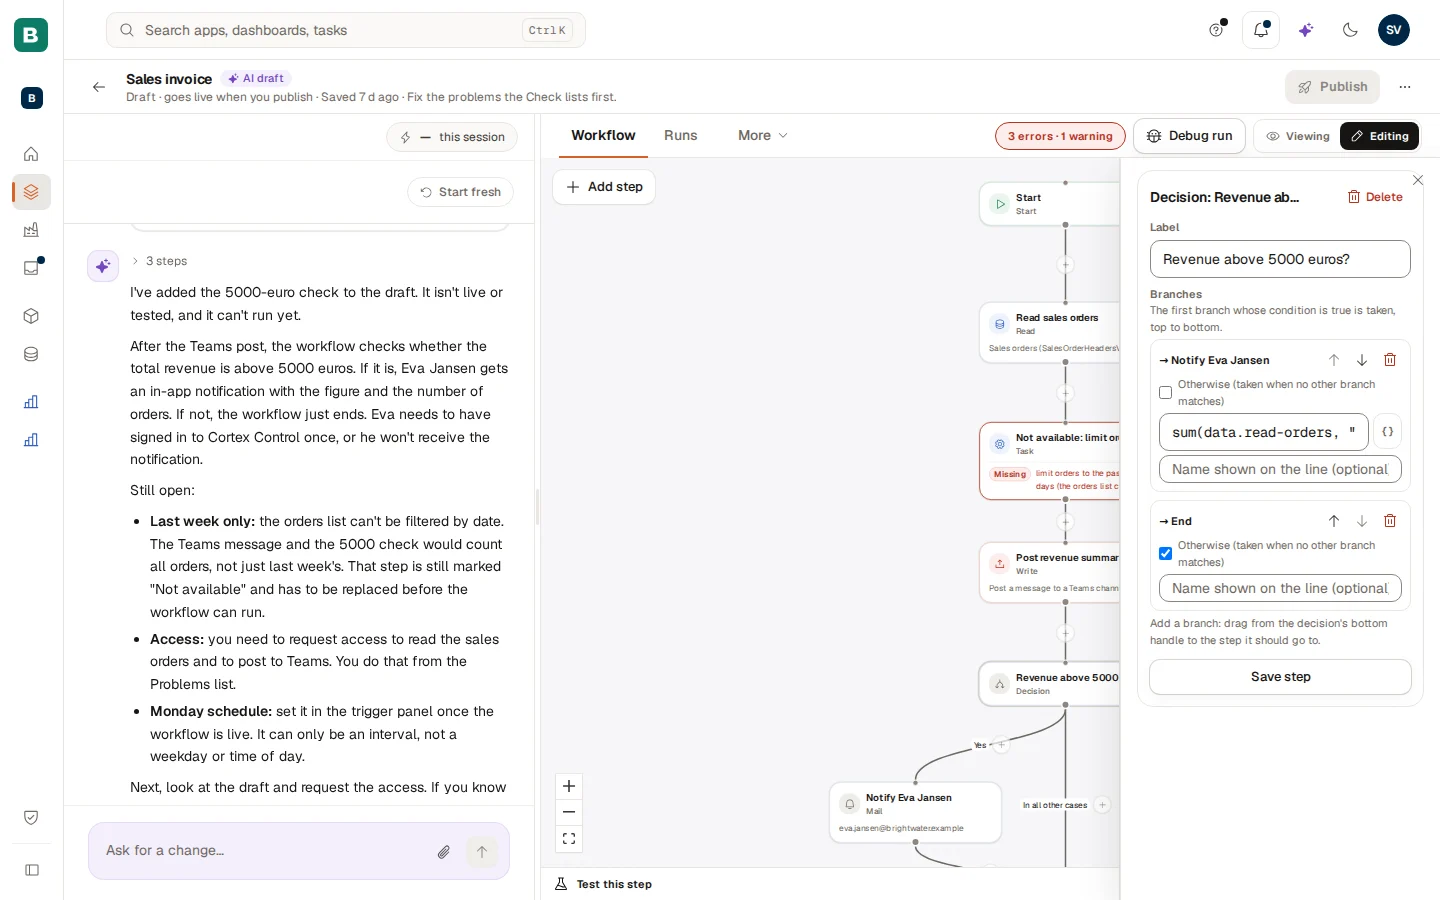
Every step has a Label and the fields of its kind. A field that takes a value shows a small curly-bracket button: use it to pick a value from an earlier step, a figure or today's date. These values appear as chips in the text and are filled in when the workflow runs. A Decision step, as here, lists its Branches: the first branch whose condition is true is taken, from top to bottom. One branch can be marked "Otherwise (taken when no other branch matches)". To add a branch, drag from the bottom handle of the decision to the step it should go to.
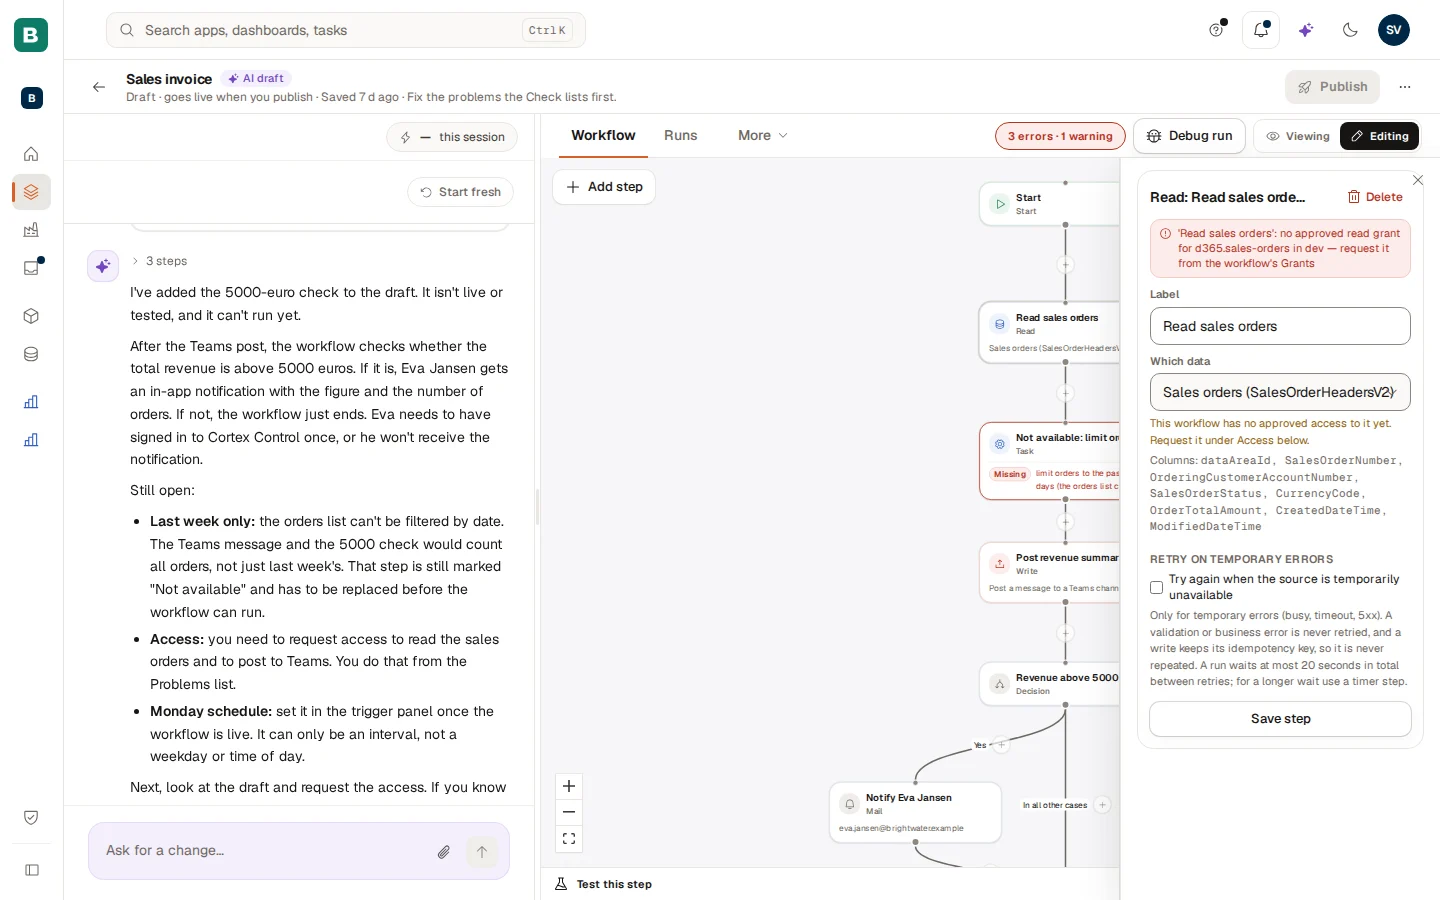
A Read step reads rows from a connected system and makes them available to the steps after it, for example to count the orders or to fill a message. If it reads from something the workflow may not use yet, a red message at the top says so and the field Which data adds "This workflow has no approved access to it yet. Request it under Access below.": see Give the workflow the data it needs.
Set up an approval
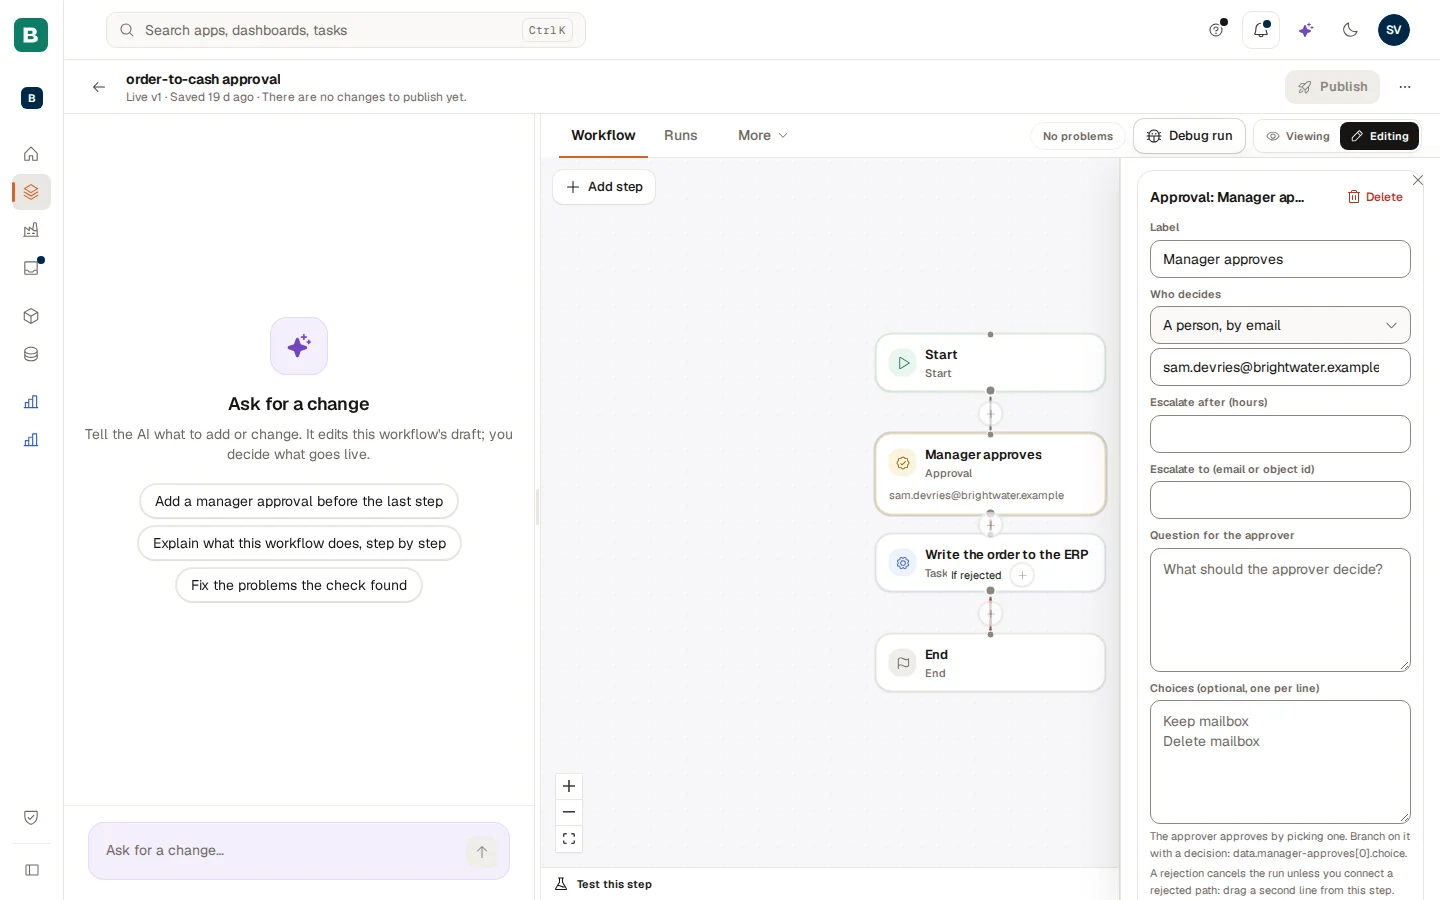
Brightwater's order approval has one approval: the manager decides.
Add the Approval step
Choose Add step and pick Approval. Give it a clear Label, for example "Manager approves".
Choose who decides
Under Assignee choose Who decides: whoever started the run, a person, or a group. Sam picks the sales manager.
Write the question
Write the Question for the approver: for example "Approve this sales order?" The approver sees this in the Inbox. Under What the approver sees you get a preview of the task in Cortex Hub, with your own rights.
Add options if you need them
Optional settings are in the table below.
| Setting | What it does |
|---|---|
| Task form | Fields the approver fills in when approving: text, number, date, choice or yes / no, each optionally required, with help text. The answers can be used in later steps. A field can be hidden in the run history. |
| More approvers | Co-approvers (one e-mail per line) and Approvals needed: any one of them, all of them, or the first N. Order: all at once, or one after another. |
| Reminders | Remind after (hours) and Then every (hours), at most 3 reminders, to whoever still owes a decision. |
| Escalate after (hours) | Passes the task on when nobody has decided in time. |
| Four-eyes | Someone who decided an earlier approval may not decide this one. Holds in every environment, test runs included. |
| Hand over | Whether the assignee may hand the task to someone else, and to whom besides the approvers. Every hand-over is recorded. |
The requester can never approve their own run in production. Rejecting either cancels the run or continues on a rejected path; the step tells you which. Approvers see the task in their Inbox under For you.
Choose what starts a workflow
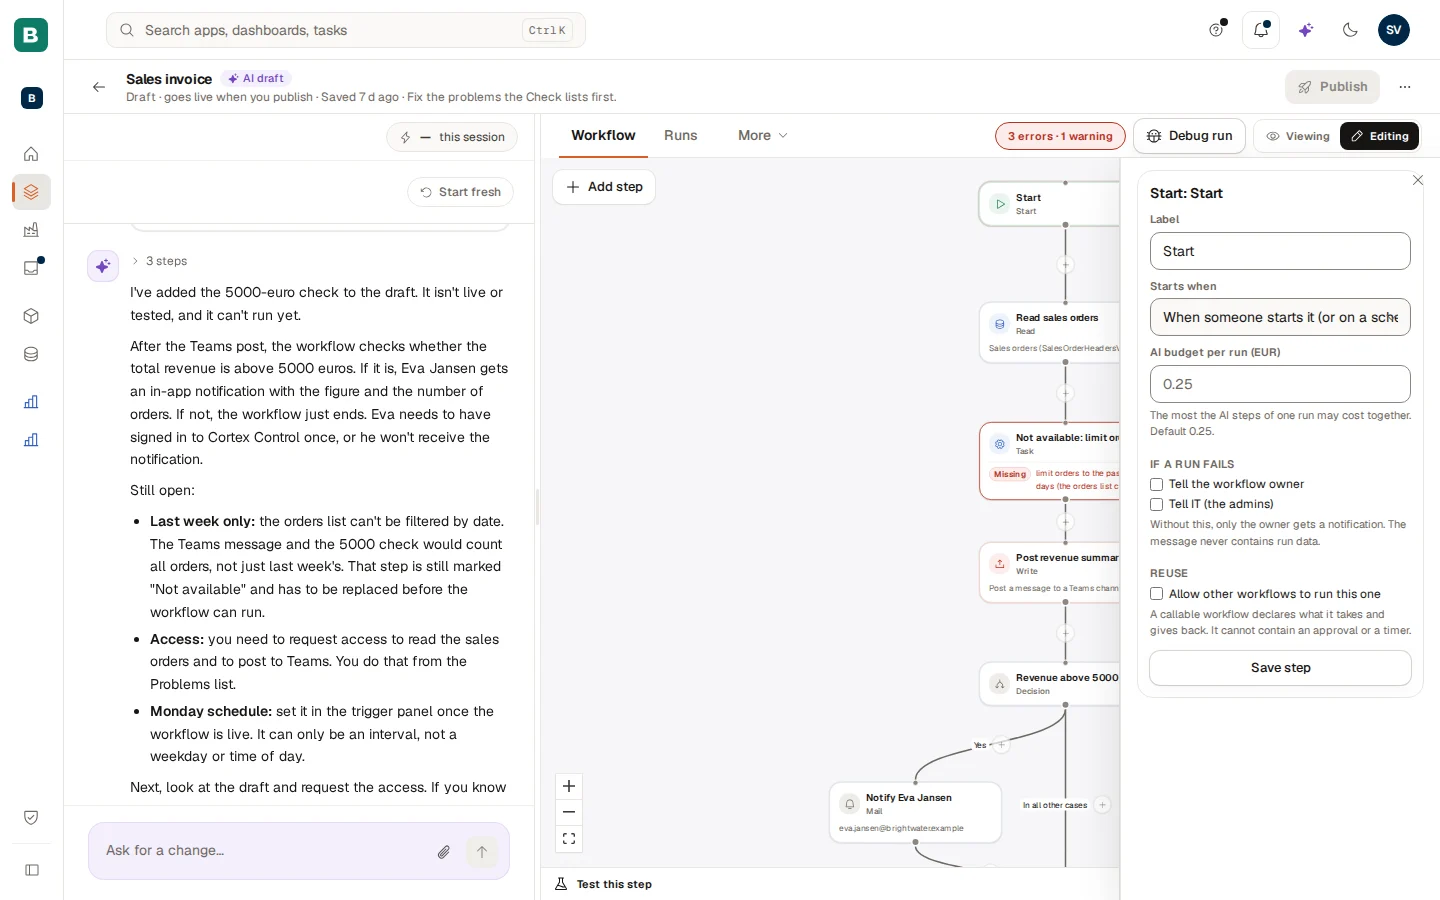
Select the Start step. It holds what starts the workflow and the rules for every run.
- Starts when: choose one of the triggers below.
- AI budget per run: the most the AI steps of one run may cost together. The default is shown under the field.
- If a run fails: tick Tell the workflow owner and Tell IT (the admins), and optionally also an e-mail. Without this, only the owner gets a notification. The message never contains run data.
- Reuse: Allow other workflows to run this one makes it a callable workflow that declares what it takes and gives back. It cannot hold an approval or a timer.
| Trigger | What starts a run |
|---|---|
| When someone starts it (or on a schedule) | A person starts it from the app that offers it, or the schedule fires. |
| A new record appears in a dataset | Every new record starts one run; records that existed before the workflow went live never do. Choose how often to check for new records. A trigger can also start on records that change (on: new by default, changed, or both): a change starts one run per new version of the record, a delete never starts one, and changed / both need a dataset IT mirrors. |
| An app sends an event | Give the Event name (lowercase, for example order.created) and the App that sends it. An Admin must approve the event under Approvals first. |
| An external system calls a webhook | Once a live version has the trigger, the panel shows the Address (POST) and lets you Create secret. Copy the secret at once: it is shown only once. Rotate secret creates a new one and the old one keeps working for 15 minutes. Requests must be signed; the panel explains how. |
| A figure crosses a line | Choose the Model, a certified figure, what Starts when the figure does ("rises above", "drops below" and so on) in relation to The line, and optionally "One run per" a field. Checked every 5 minutes; it starts a run when the figure moves into breach, then again only after it has left the breach and the cool-down has passed. |
Run on a schedule
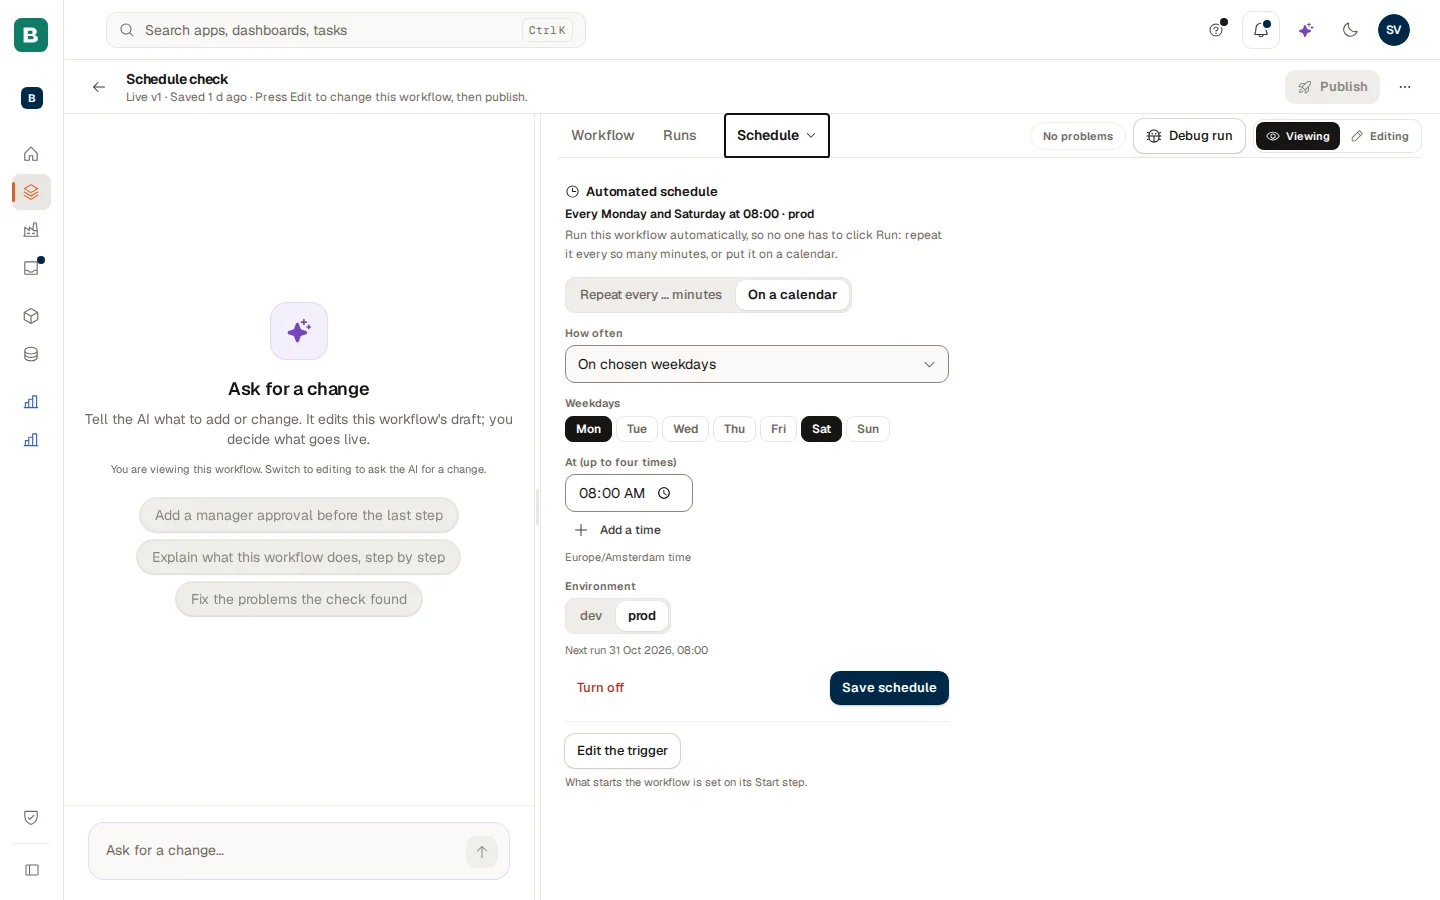
The schedule can be set once the workflow is live. Open More and then Schedule ("Automated schedule").
Pick the kind
Choose Repeat every ... minutes (at least 5) or On a calendar.
Set the calendar
For a calendar, choose How often (for example On chosen weekdays), the weekdays or the day of the month, and up to four times with Add a time. Times are in Europe/Amsterdam time.
Choose the environment and save
Choose the Environment (Test or Production), check the Next run line and choose Save schedule. Turn off stops it. Edit the trigger jumps back to the Start step.
Give the workflow the data it needs
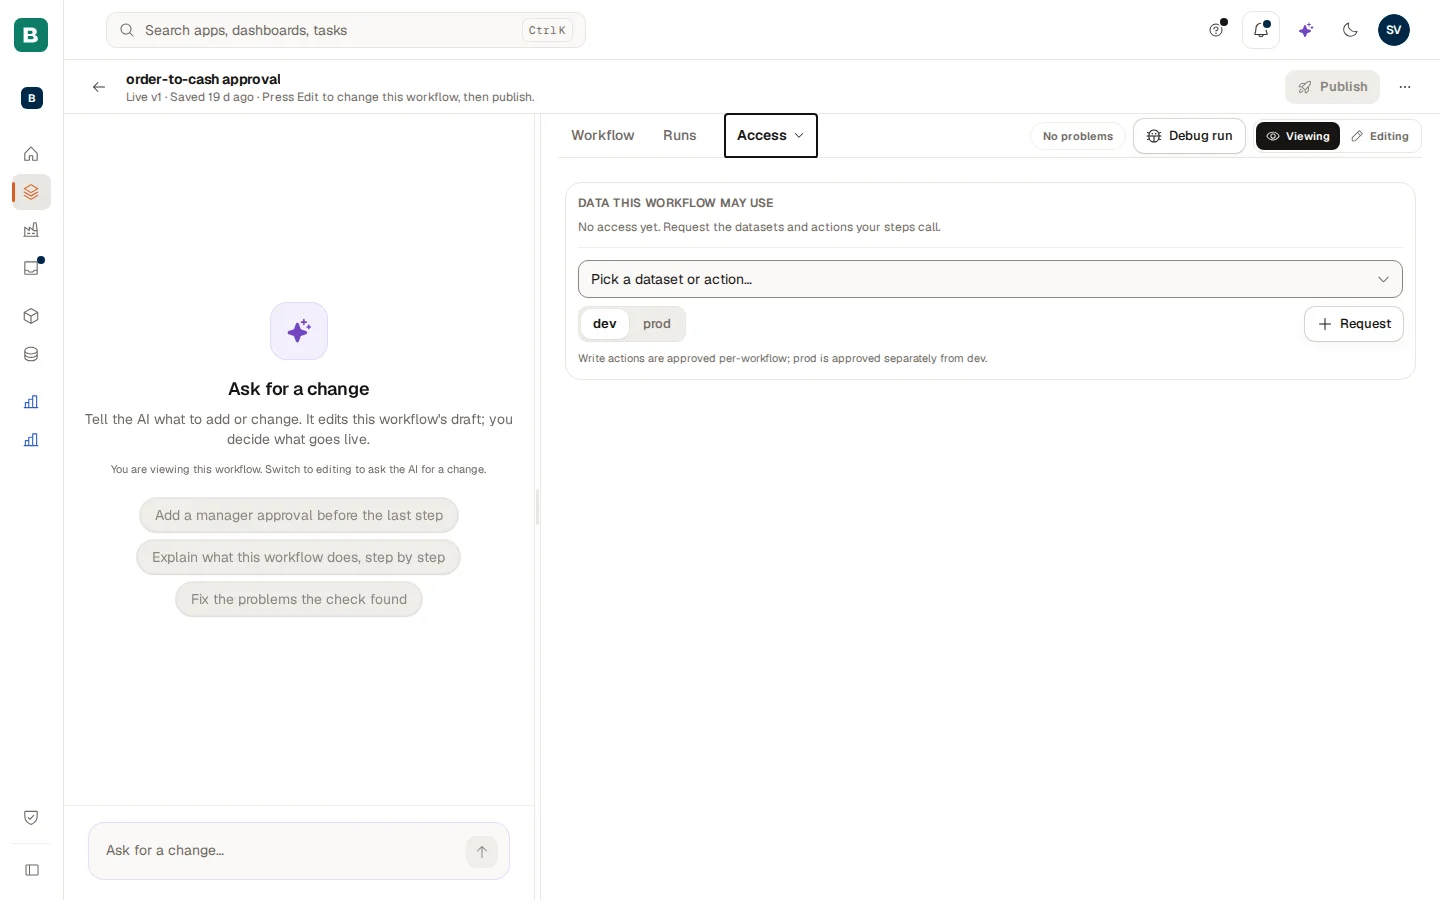
Open More and then Access ("Data this workflow may use"). Under "Dataset or action to request" pick what your steps call and choose Request. IT approves it. Write actions are approved per workflow, and production is approved separately from test. A step that points to something with no approved access says "no access yet", and the problems list (the chip with the error count above the canvas) offers Request it or Ask AI to fix it. Going live with a write asks an admin to approve it in one go, see Test, run and publish a workflow.
Sample data
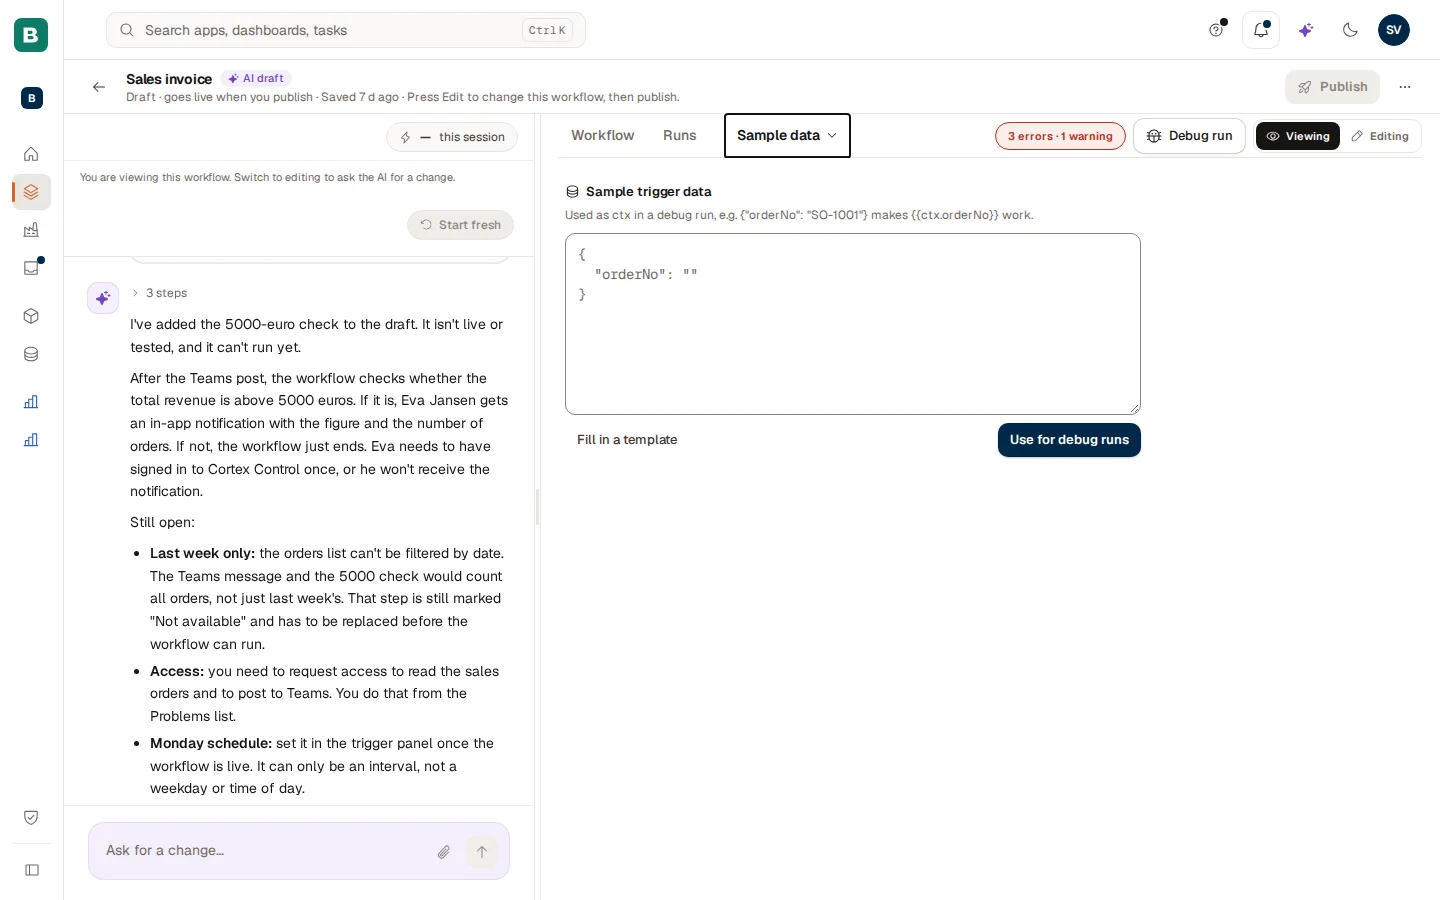
A test run needs something to start with. Open More and then Sample data ("Sample trigger data") and give the starting data as JSON. It is used as the context of a debug run: for example the sample {"orderNo": "SO-1001"} makes the value {{ctx.orderNo}} work in the steps. Fill in a template writes a template for what your trigger delivers, and Use for debug runs saves it. Not valid JSON? The panel says so. For a workflow that starts on a new record, pick a record from the dataset ("Pick a record ... to test with") or choose to fill in the columns yourself.
Test while you build
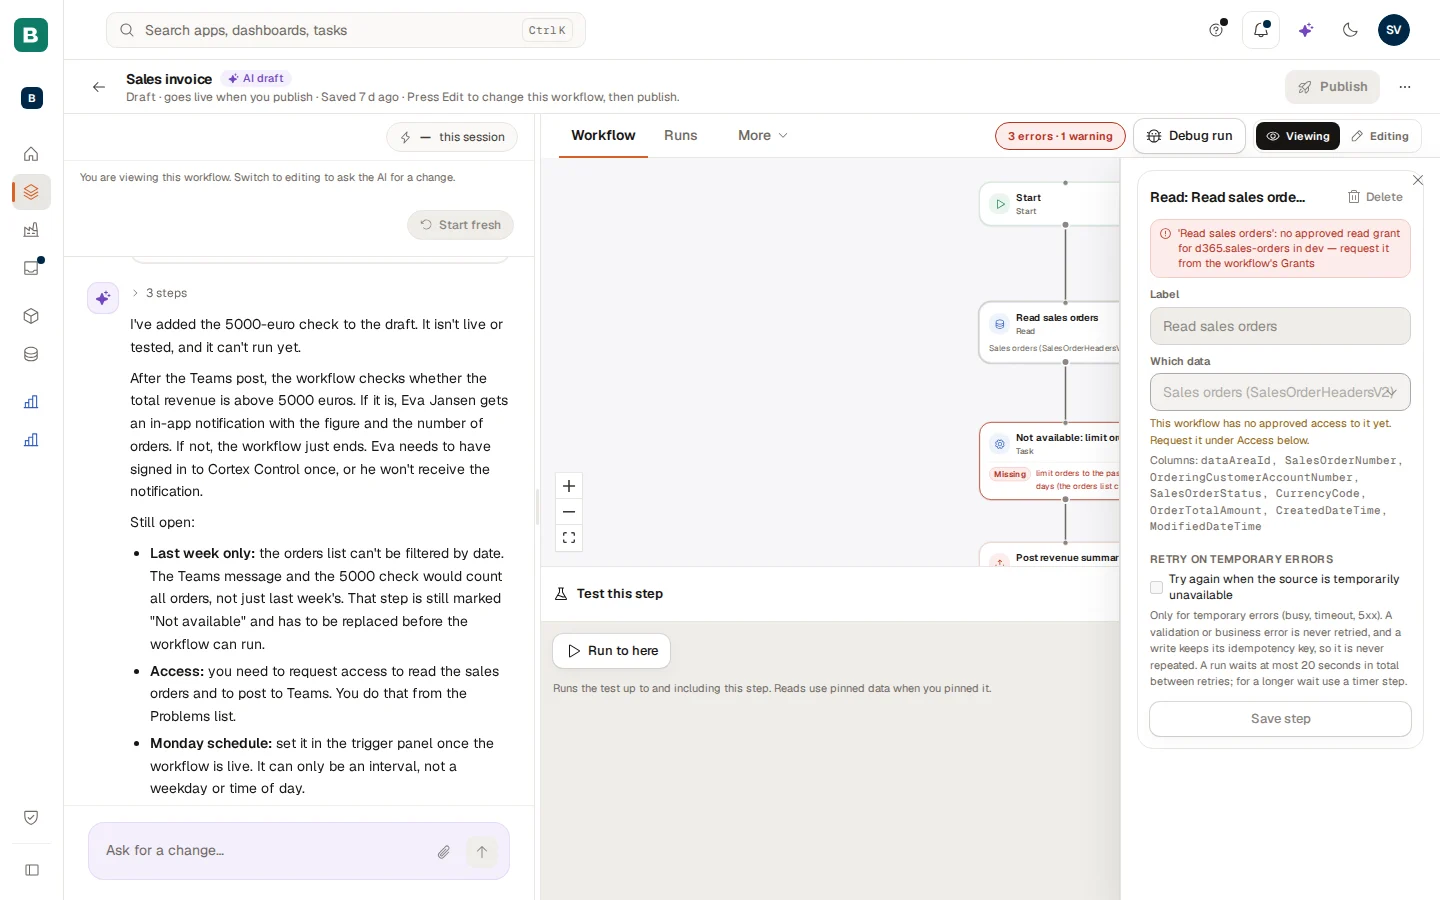
Under the canvas sits the Test this step dock. It says "Select a step to test it." until you pick one. With a step selected you can choose Run to here to run the test up to and including that step and stop right after it. Reads use pinned data when you pinned it. Use the icons in the header of the dock to collapse it or move it. The full story of debug runs and pins is in Test, run and publish a workflow.
The ... menu
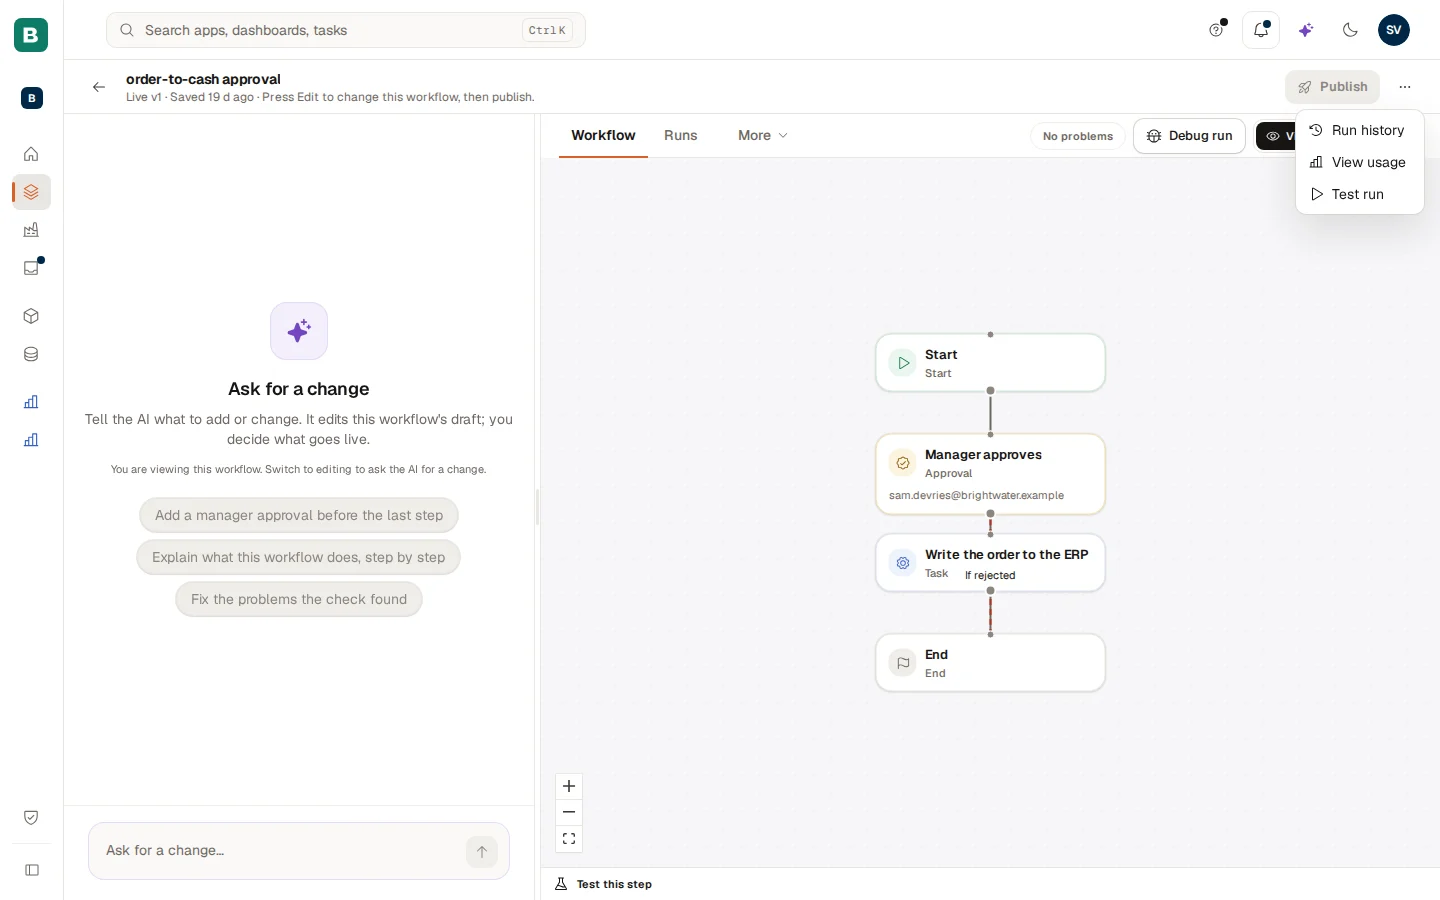
The ... at the top right holds:
- Run history: opens the Runs tab.
- View usage: opens the usage dashboard filtered to this workflow in a new tab.
- Test run: starts one real run of the live version in the test environment. Only a live workflow has it.
On a narrow window the menu also holds Debug run and the switch between viewing and editing.
Reference
| You see | It means |
|---|---|
| AI draft | The assistant wrote this draft and nobody has reviewed it yet. It disappears when a person edits it. |
| Draft · goes live when you publish | The workflow has never been published. |
| Live v1 | Version 1 is live. With "n changes not published yet" you have edits that are not live. |
| Missing (red step) | The draft asked for something that is not available, such as an action or data. Replace the step before the workflow can run. |
| The error and warning chip | The Check list of what would stop a real run. Choose it for the list. |
Frequently asked questions
Test, run and publish
Debug runs, the runs list, publishing and going back to an earlier version.
Experiences for builders
Where your workflows sit next to apps and dashboards.
Start a workflow as a user
How people start a workflow from an app.
Follow a run in Hub
What a person sees of a run and how they approve a step.
Build an app
Plan an app with the assistant, build and preview it, steer the assistant, review files, versions and checks, and publish it to production.
Test, run and publish a workflow
Test a workflow with a debug run, follow its runs, handle a waiting run and the Inbox task, publish it and go back to an earlier version.