Documents and sources
Add documents so Ask can answer from them, file them on a model, a type of record or one record, and request access to a source or upload ad-hoc data.
This page covers two things builders do next to modelling. Documents are the manuals, procedures and scans that Ask can quote. Sources are the systems your data comes from: you see which ones IT has connected, ask for access to what you need and upload a one-off file.
Who can do this
Builders (people with a Studio seat) and admins. Adding and filing documents needs the Builder role and edit rights on the model they belong to. IT approves access to sources.
Documents: let Ask answer from your manuals
A document belongs to one model. You add it to the model's library and file it where it applies: on the whole model, on every record of one type (for example every energy meter), or on one record (one meter). Ask can then find it and quotes it as "from documents, not certified". Filing never changes what a document says.
Who finds a document depends on where it is filed. A document filed on a record is found only by people who can see that record. Filed on the type or on the model, everyone who may see the model finds it.
Who sees a section's documents follows the section's Who can read this model list. If that list is switched on and you are not on it, the Documents page of that section says "Not available to you". The owners of the section and the administrators always see its documents.
The Documents tab of a model
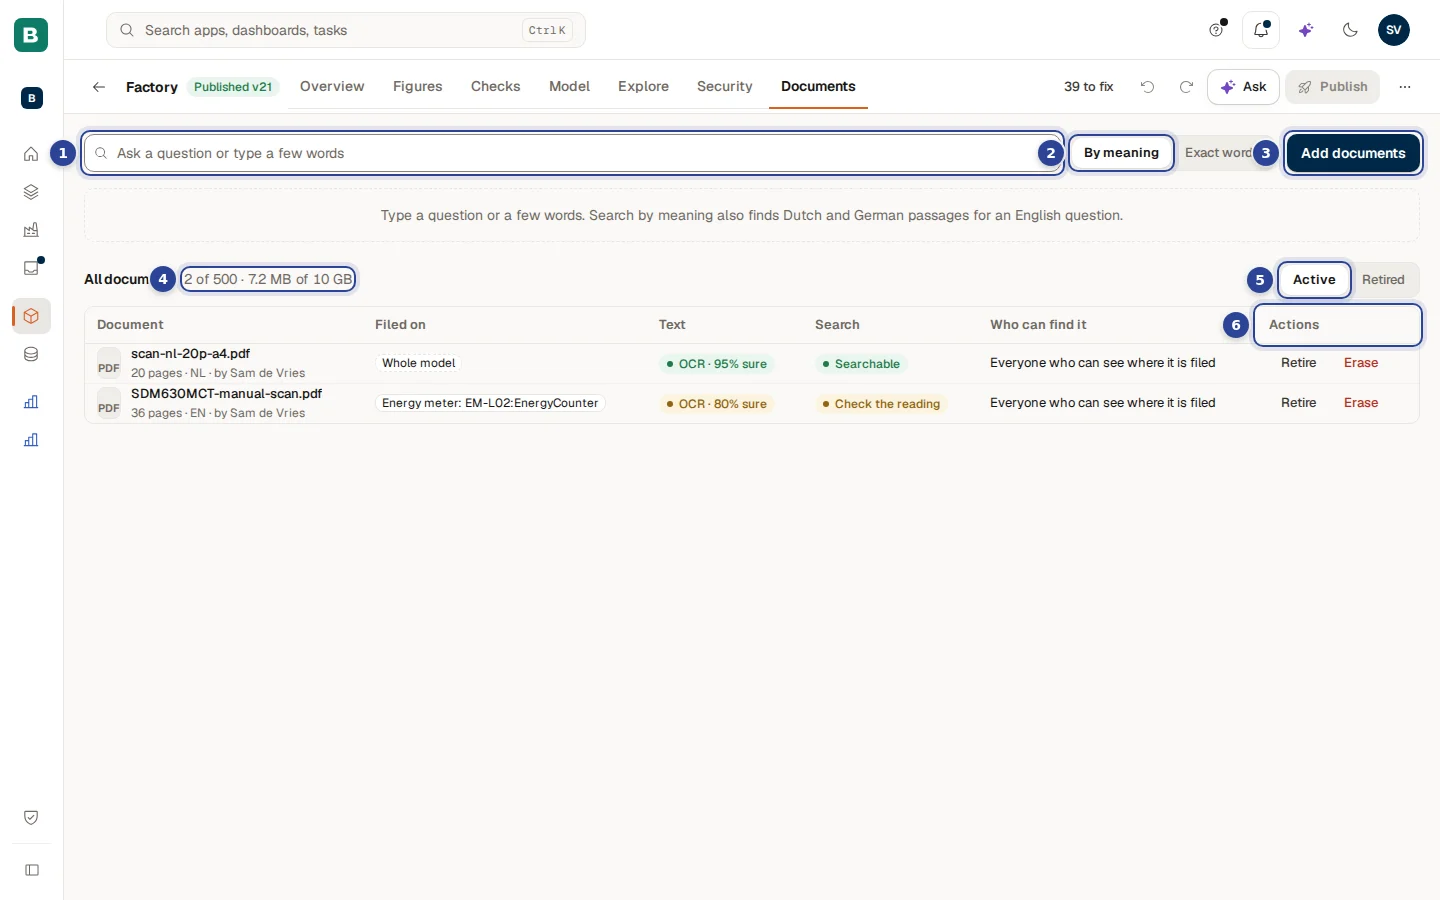
- The search box ("Ask a question or type a few words"). Test what a question finds in your documents before anyone asks it in Ask.
- The search mode. By meaning also finds Dutch and German passages for an English question; Exact words only finds the words you typed.
- Add documents. Opens the upload window (see below).
- The usage counter, for example "2 of 500 · 7.2 MB of 10 GB": how many documents and how much storage the library uses of what is allowed.
- Active and Retired. Switch between the documents in use and those you retired.
- Actions. What you can do with a document (see the table below).
The list has these columns: Document (file name, number of pages, language and who added it), Filed on (Whole model, "Energy meter (all)" or "Energy meter: EM-L02:EnergyCounter"), Text, Search and Who can find it.
| Column | Values and what they mean |
|---|---|
| Text | Text layer: the file already held text. OCR · 95% sure or Read by OCR: a scan, read by character recognition, with how sure the reading is. Reading page 5 of 20 and Waiting to be read while it is in progress. Not read if reading failed. |
| Search | Reading, Indexing, Searchable (Ask can find it), Check the reading (the reading was shaky, see below), Failed, Retired or Erased. |
| Who can find it | For example "Everyone who can see where it is filed". |
| Actions | Retire (take it out of use; Restore brings it back), Read again and Index again (for a document that failed or was read badly), and Erase. |
How do I add documents?
Choose the model
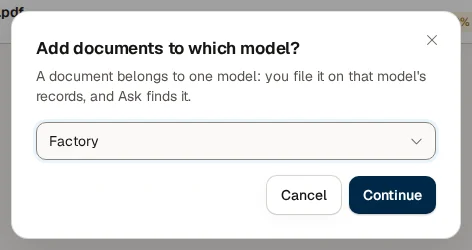
From the model's Documents tab choose Add documents. From the list of all documents (Models, then All documents) choose Add documents and pick the model first: "Add documents to which model?" and Continue. If you cannot add to any model, ask the owner of a model to make you an editor.
Drop the files and choose the language
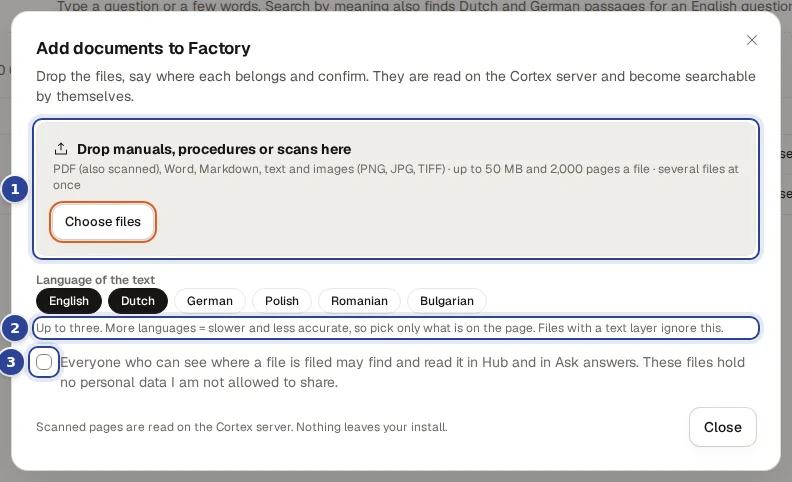
- The drop area ("Drop manuals, procedures or scans here"). Drop files or choose Choose files. PDF (also scanned), Word, Markdown, text and images (PNG, JPG, TIFF), up to 50 MB and 2,000 pages a file, several files at once. A file of another type, or an empty one, is refused with a message naming it.
- The language of the text (English, Dutch, German, Polish, Romanian, Bulgarian). Choose up to three. More languages make reading slower and less accurate, so pick only what is on the page. Files that already have a text layer ignore this.
- The confirmation. Tick that everyone who can see where a file is filed may find and read it in Hub and in Ask answers, and that the files hold no personal data you are not allowed to share. Add documents stays off until you do.
Say where each file belongs
After you choose files, every file gets its own row with File on: The whole model, Every record type, or One record of a type. For one record, fill in its key under "Key of the ..." (for example the key of the meter).
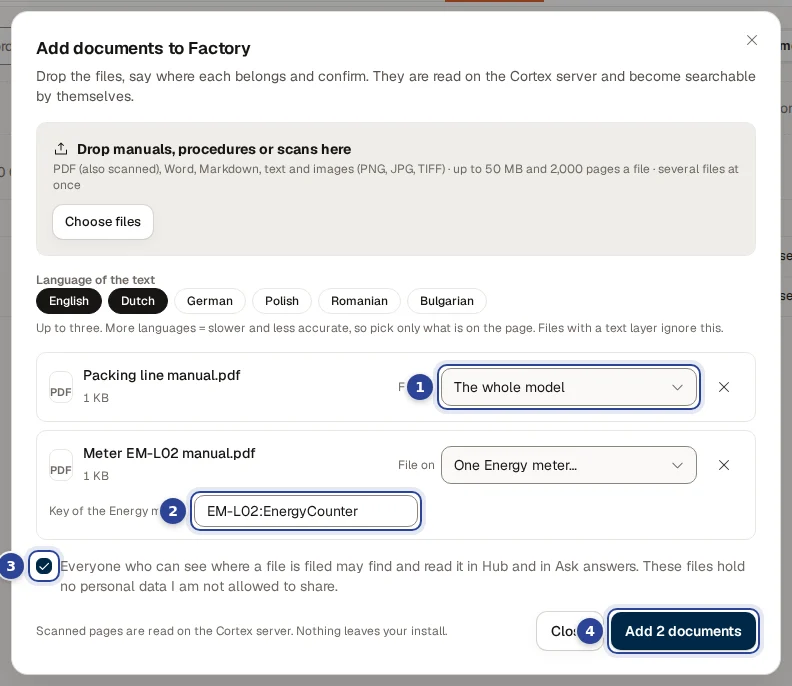
- File on. Per file: the whole model, every record of a type, or one record.
- The key of the record, shown when you chose one record.
- The confirmation, ticked.
- The submit button, "Add 2 documents" (or "Add 1 document").
Add and wait for the reading
Choose the button. Each file shows its state: Waiting, Sending…, then Added, Already in the library (a duplicate) or Send again if the upload failed. The files are read on the Cortex server (scanned pages too; nothing leaves your install). They are searchable by themselves a little later.
Open a document and check the reading
Choose the file name in the list to open the viewer.
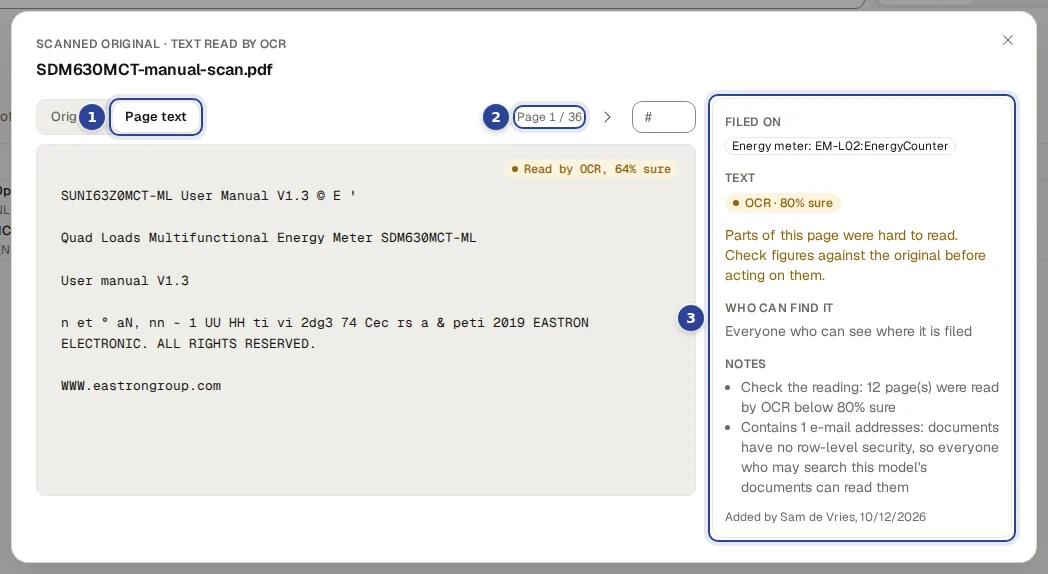
- Original and Page text. Original shows the stored file; Page text shows what Cortex read from the page. For a scan, compare the two.
- The page counter ("Page 1 / 36") with the arrows and a Go to page box.
- The side panel: where the document is filed, the state of its Text, Who can find it and Notes.
For a scan the viewer says "Scanned original · text read by OCR" and shows how sure the reading is ("Read by OCR, 64% sure"). Where a page was hard to read it warns: "Check figures against the original before acting on them." The Notes say, for example, how many pages were read below 80% sure, and when the text contains e-mail addresses, because documents have no row-level security: everyone who may search the model's documents can read them. Word, Markdown and text files are shown as text.
How do I retire or erase a document?
Retire takes a document out of use: Ask no longer finds it, but it stays in the library on the Retired switch and Restore brings it back. Erase removes it for good.
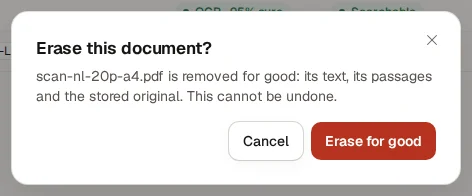
The window says the document is removed for good, "its text, its passages and the stored original", and "This cannot be undone." Choose Erase for good to confirm.
Documents on a record
You can also work from a table of the model. Open the table page (see Semantic models) and go to its Documents tab, here the energy meter of the Brightwater Factory model.
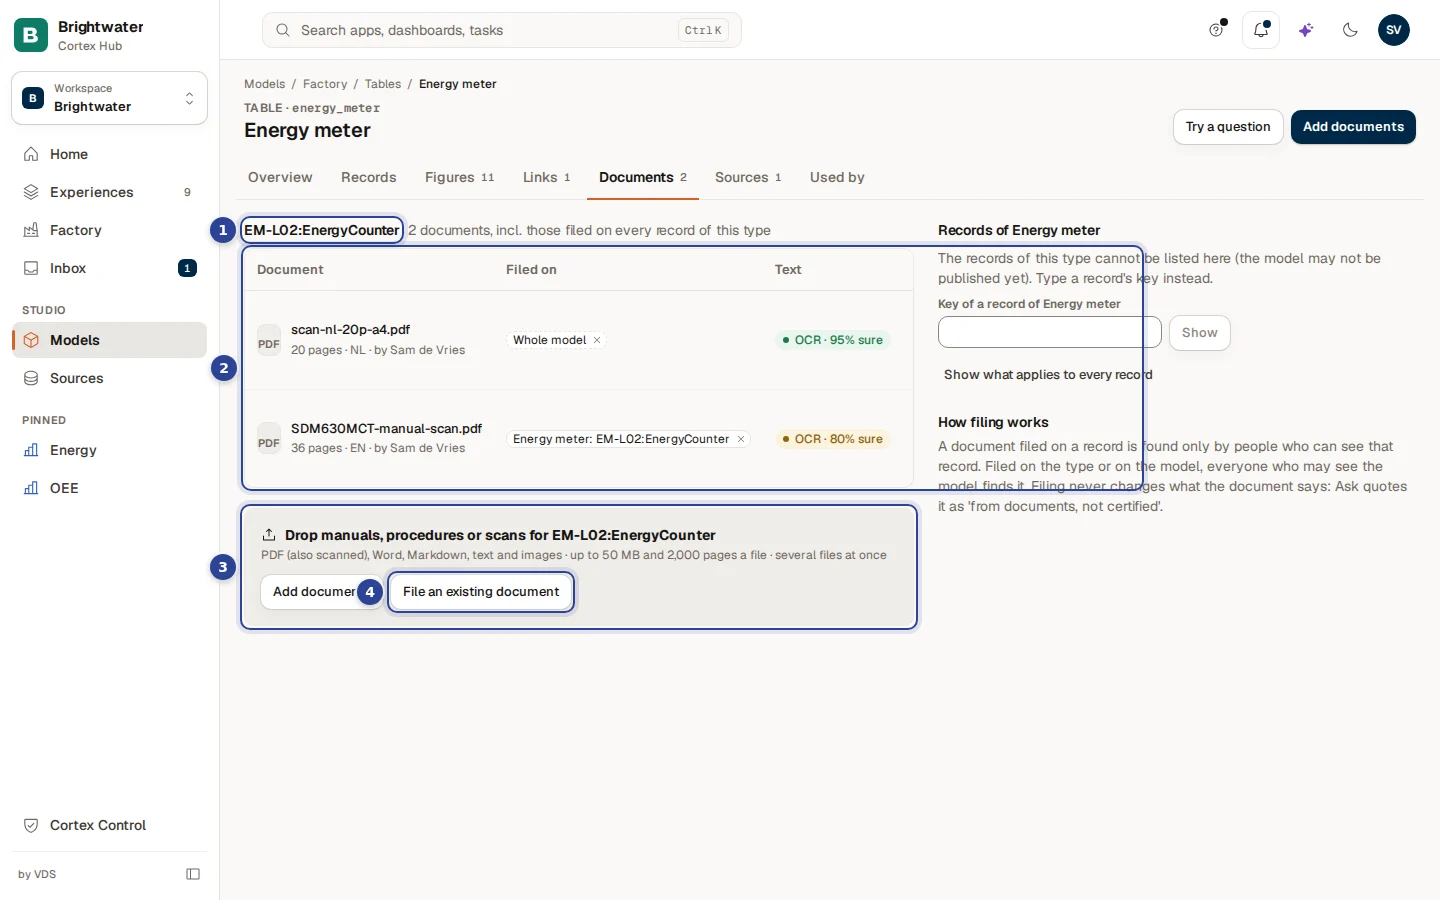
- The target. The record you picked (here a meter), with "2 documents, incl. those filed on every record of this type". Pick another record with Key of a record and Show, or Show what applies to every record.
- The documents that apply, with where each is filed. A cross next to Filed on unfiles the document from that place; it stays in the library.
- The drop area for this record ("Drop manuals, procedures or scans for ..."). Files you drop here are filed on the record straight away, after the same confirmation.
- File an existing document. Adds one more place for a document that is already in the library.
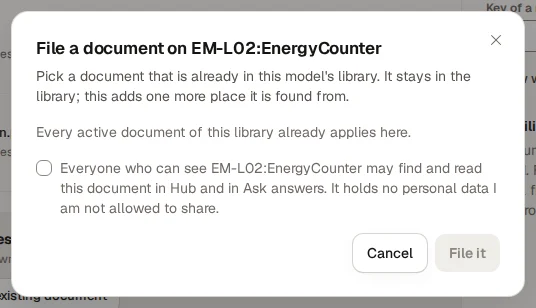
In that window choose the Document, tick the confirmation ("Everyone who can see ... may find and read this document in Hub and in Ask answers. It holds no personal data I am not allowed to share.") and choose File it. If every active document already applies here, it says so.
Sources: see what is connected and ask for access
A source is a connection to a system that IT has vetted. Nothing reaches your apps or workflows until IT approves it, and access for development does not cover production.
Open Sources in the Studio group of the left menu. The page has two tabs: Landscape and Datasets.
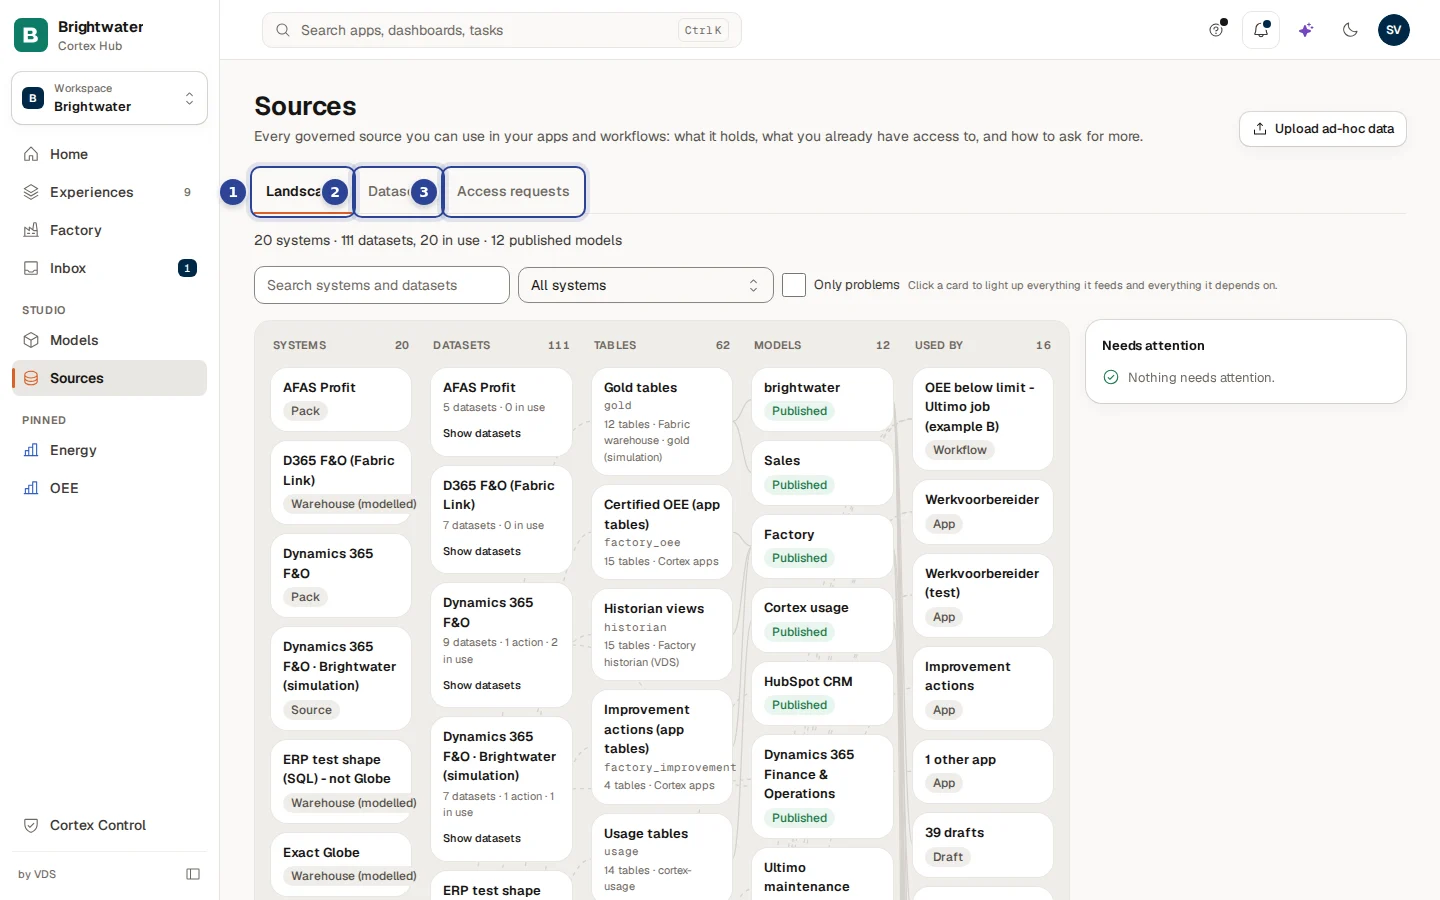
- Landscape. A map from left to right: Systems, Datasets, Tables, Models and Used by. Click a card to light up everything it feeds and everything it depends on. A summary line counts systems, datasets, those in use and published models. Search with Search systems and datasets, narrow to one system with All systems and switch on Only problems to see what is late or failing. When all is well the view says "Nothing needs attention."
- Datasets. The list to request access from.
How do I request access to a dataset?
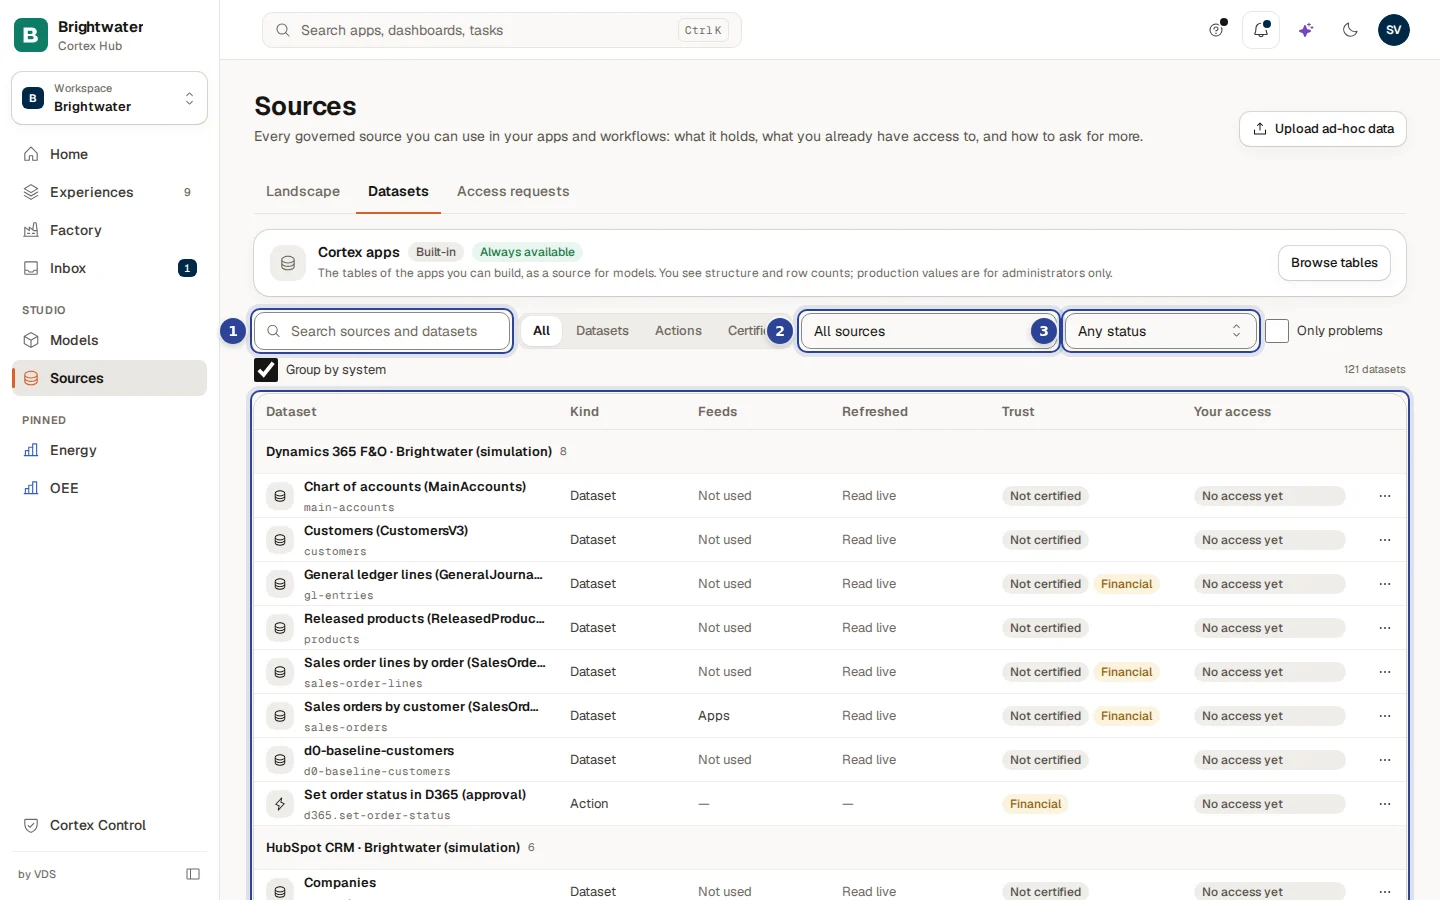
- Search sources and datasets. Find the dataset or action you need.
- All sources. Show the datasets of one source only.
- Any status. Filter on your access: Any status, Granted, Pending, Not approved, No access yet, or switch on I have access.
Below the filters is the table. Columns Name, Kind (Table, which reads, or Action, which writes), Feeds (figures, lookups, apps, not used), Refreshed (On time, Late, Failing, Never delivered, Paused, Source changed, or Live feed when it is read from the system when asked) and Trust (Certified or Not certified), and Your access. Group by system groups the rows.
Find the dataset
Search or filter until you see the dataset (or action). The column Your access shows where you stand.
Request access
Choose Request access (or Request action) in the row menu. In the window choose the Environment (Development or Production), the app it is for ("Choose the app this is for.", or Not for a specific app) and optionally say why ("Why do you need this?").
Wait for IT
The request is sent to IT ("Requested ... Sent to IT for approval."). A dataset you may use shows Granted, one that waits shows Pending, and a refused one shows Not approved; choose Request access again to ask once more. An action writes back to the source system, so your app can only run it once IT approves it.
Where do I see my requests?
In your Inbox, under Sent. Every request you made, of every kind, is listed there with its status ("Waiting for review", granted or refused), who decided it and when, the reason when IT gave one, and an Open dataset link for a dataset request. Access you were given also shows on the Datasets tab. There is no separate requests tab on Sources.
What if the system I need is not listed?
The Datasets tab ends with "Need a system that isn't listed?" and the button Request a source. Describe the system you need connected ("Briefly describe the system you need.") and send it. The page confirms: "Sent to support. We'll scope the connection."
How do I upload ad-hoc data?
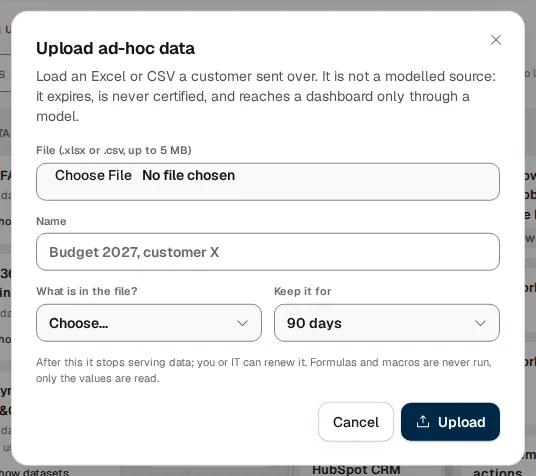
Choose Upload ad-hoc data on the Sources page to load an Excel or CSV file a customer sent you (File (.xlsx or .csv, up to ... MB)). Give it a Name ("Budget 2027, customer X"), say What is in the file? (General business data or Contains personal data) and choose how long to Keep it for. Then choose Upload.
Ad-hoc data is not a modelled source: it expires, is never certified (it shows as "Ad hoc · not certified"), and reaches a dashboard only through a model. Formulas and macros are never run, only the values are read. After the retention period it stops serving data; you or IT can Renew it. Your ad-hoc data lists what you uploaded, with "until ..." or "expired ...". On some installs IT approves an upload first: the button then reads Send for approval and the request waits under "waiting for IT". On others only an IT admin may upload ("Only an IT admin may load ad-hoc data on this tenant.").
Example: manuals for the packing line at Brightwater
Brightwater Foods has a Factory model with a table of energy meters. Sam de Vries has two PDF files: a manual for the packing line and a scanned manual for the meter on line 2.
- Sam opens the Factory model, goes to Documents and chooses Add documents.
- Sam drops both files and picks English as the language (one language, because the scan is English).
- The packing line manual is filed on The whole model. The meter manual is filed on One Energy meter... with the key of the meter on line 2.
- Sam ticks the confirmation (neither file holds personal data) and chooses Add 2 documents.
- A few minutes later the scan shows OCR · 80% sure and Check the reading. Sam opens it, compares Original and Page text and sees that a table of figures was read badly. Sam asks a colleague to check those figures against the original before anyone relies on them.
- Someone asks Ask "what is the maximum current of the meter on line 2?". Ask answers with a "From documents" badge, cites the page and says the answer is not certified.
Questions and troubleshooting
Model checks
See what Cortex checks on your model every night, add checks of your own, run them now and understand what happens when one fails.
Experiences for builders
The builder's list of every app, dashboard and workflow: filters, cards, the card menu, expected use, moving, clean-up, requesting an app and managing it.